
Contact Form
User Guide
Contact Form | 4.2.0 * |
WordPress | 5.5 * |
Contact form to DB | 1.6.4 * |
Captcha | 5.0.8* |
ReCaptcha | 1.57 * |
Subscriber | 1.4.5 * |
Contact Form Multi | 1.2.7 * |
*When using other versions some differences are possible to occur
** Screenshots were taken from a PC
Table of Contents
2.3. Add Department Selectbox To The Contact Form
2.4. Save Emails To The Database
3.3. Add Field ‘Reply-To’ to the Email Header
3.7. Google Analytics Measurement ID
3.8.1. Add Tips Below the Attachment
3.8.6. Subscriber by BestWebSoft
3.8.8. reCaptcha by BestWebSoft
3.9. Delete an Attachment File From the Server After the Email is Sent
3.10. Email in HTML Format Sending
3.11. Display Additional Info in the Email
3.12. Language Settings for the Field Names in the Form
3.13. Change the Names of the Contact Form Fields and Error Messages
3.14. Use the Changed Names of Contact Form Fields in the Email
3.15. Action After Email is Sent
4.8. Add Placeholder to the Input Blocks
8. Add the Contact Form on Page or Post.
You can download Contact Form plugin here:
https://bestwebsoft.com/products/wordpress/plugins/contact-form/
1. Introduction
Note: Сlick the “Save Changes” button in order to apply any changes. |
1.1. Open your WordPress Admin Dashboard and find the menu on the left.

1.2. Open the ”Contact Form” > “Settings” page.

2. Settings
Use the options of the “Settings” page to change the global settings of the plugin.
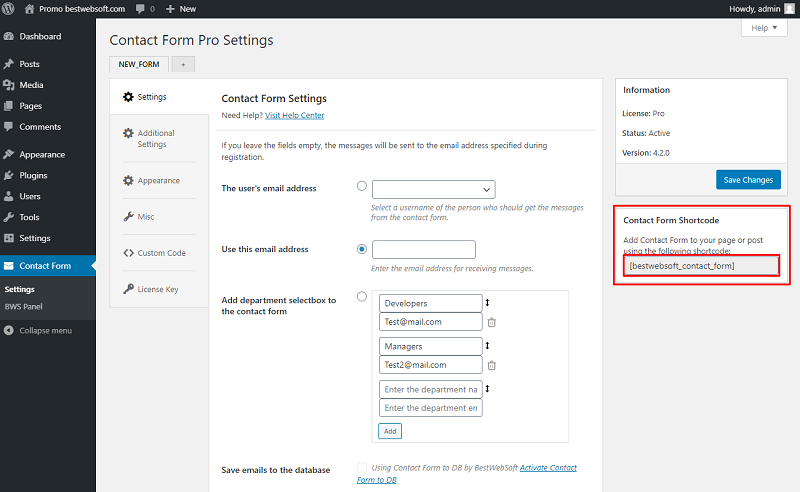
2.1. The User’s Email Address
Use the “The user's email address” option to select a username of the person who should get the messages from the contact form.

2.2. Use This Email Address
Use the “Use this email address” option to enter a preferred email to receive emails in the input field.

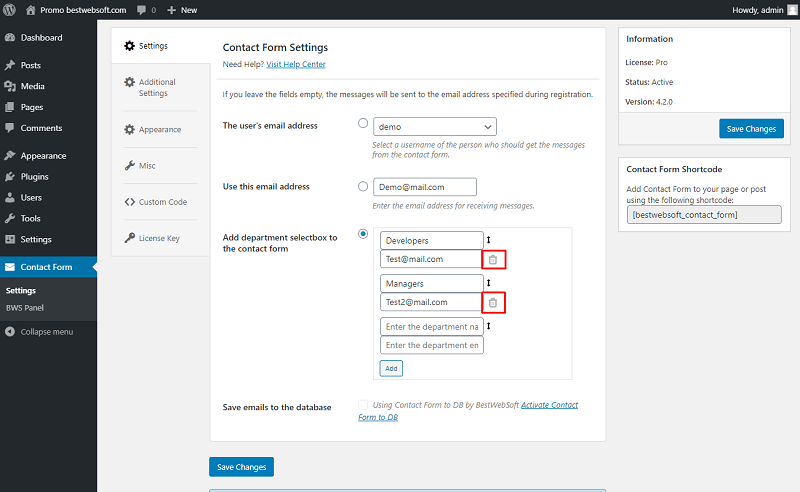
2.3. Add Department Selectbox To The Contact Form
Use “Add department selectbox to the contact form” to add multiple departments specifying their names and email addresses to receive emails.

2.3.1. Enter the department name and email to the appropriate fields.

2.3.2. Click the “Add” button to add a new department.
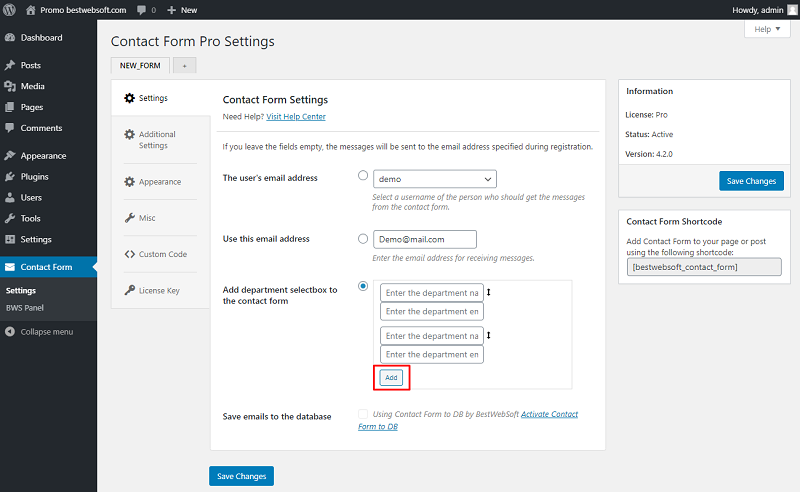
2.3.3. Click the “Trash” icon to delete the department.
2.3.4. Department selection may look on the contact form as follows.

2.4. Save Emails To The Database
Contact Form by BestWebSoft is compatible with the “Contact Form to DB by BestWebSoft” plugin which allows to save emails to the database.
You can download the “Contact Form to DB by BestWebSoft” plugin here:
https://bestwebsoft.com/products/wordpress/plugins/contact-form-to-db/.

2.4.1. Install and activate the “Contact Form to DB” plugin and enable the “Save emails to the database” option.
Note: Make sure that the “Save emails to the database” option on the “Contact Form to DB” settings page is enabled. |

2.4.2. Messages, sent via the contact form will be saved in the database and displayed on the “CF to DB” page.

3. Additional Settings
Use the options of the “Additional Settings” tab to make the fine-tuning to the contact form.
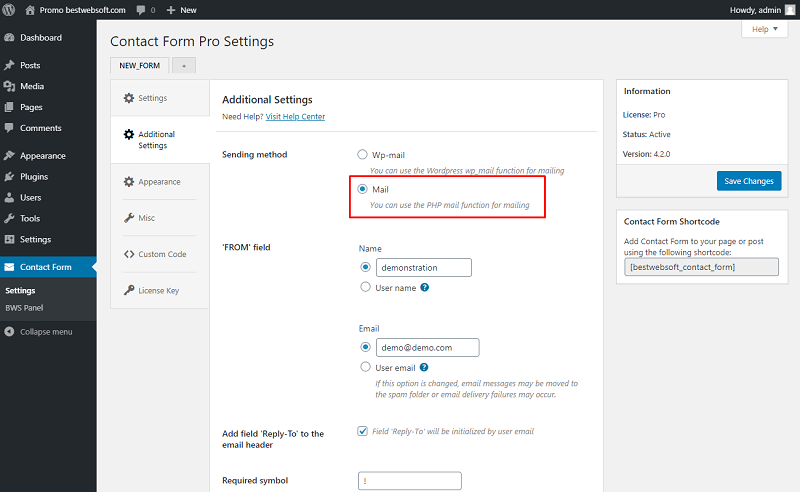
3.1. Sending Method
Use the “Sending method” option to choose the sending method that will perform email sending.

3.1.1. Choose the “Wp-mail” to use the WordPress wp_mail function for mailing.

3.1.2. Choose the “Mail” to use the PHP mail function for mailing.
3.2. ‘FROM’ field
Use the “‘FROM’ field” option to set up sender details which will be displayed in the email.
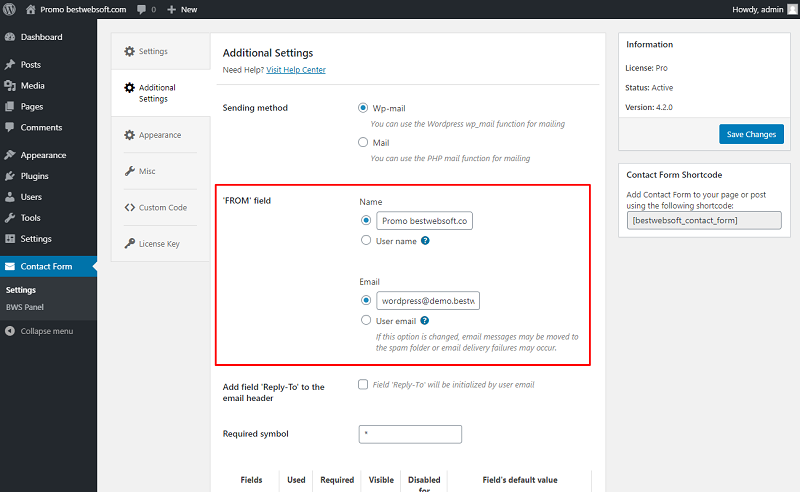
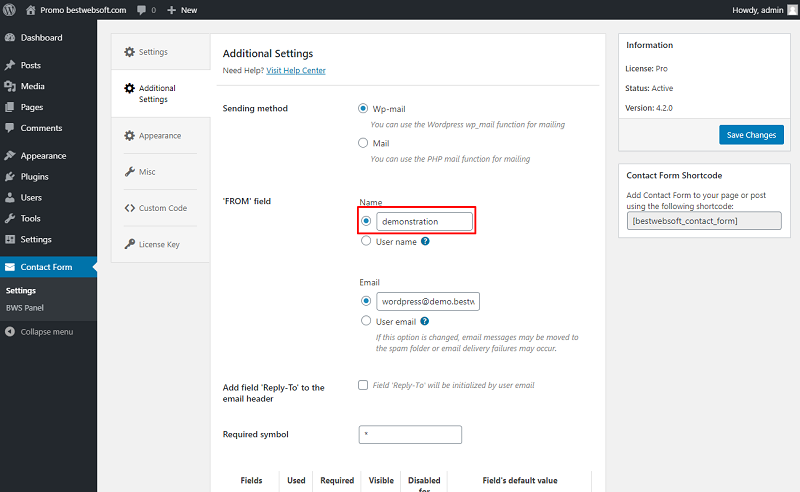
3.2.1. Choose the “Name” that will be used in the “From” field.

3.2.2. Enter the custom name into the appropriate field.
3.2.3. Choose the “User name” to use the name of the user who fills the form.

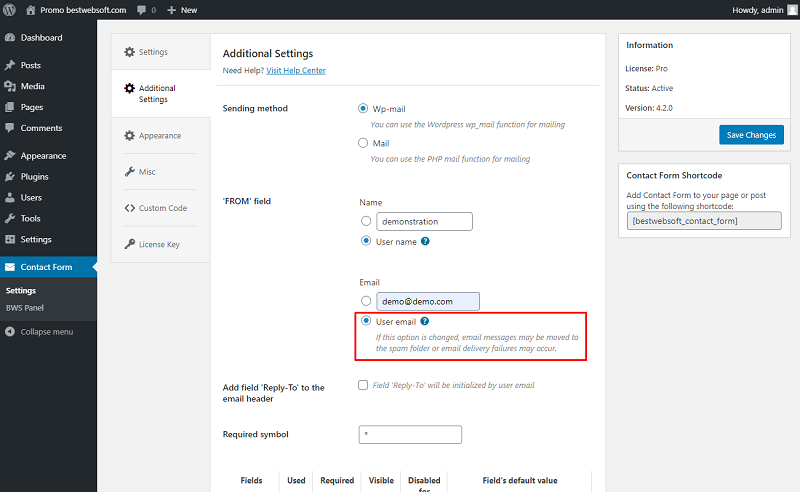
3.2.4. Choose the “Email” that will be used in the “From” field.

3.2.5. Enter the custom email into the appropriate field.
Note: If the email address is changed, messages may be moved to the spam folder or email delivery failures may occur. |

3.2.6. Choose the “User email” to use the email of the user who fills the form.
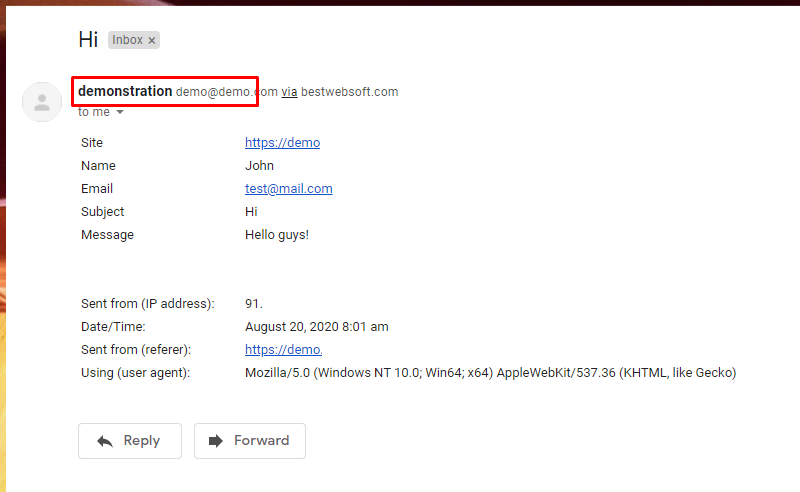
3.2.7. The ‘FROM’ field with custom name and email will look in an email message as follows.
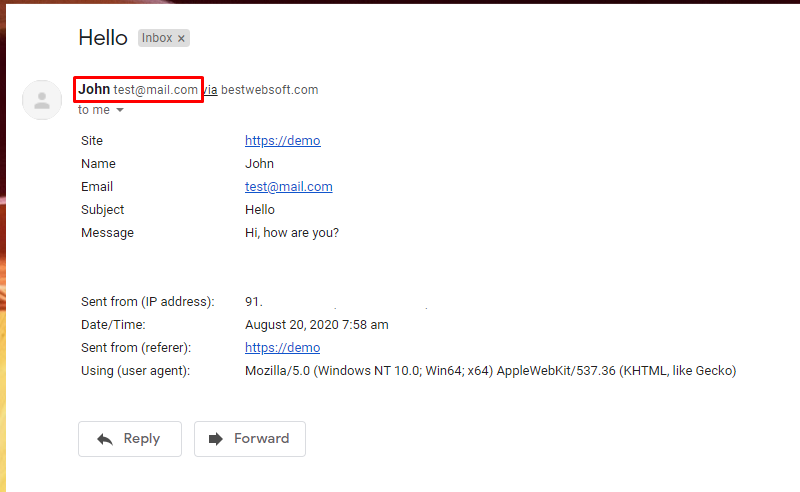
3.2.8. The ‘FROM’ field with a user name and a user email will look in an email message as follows.
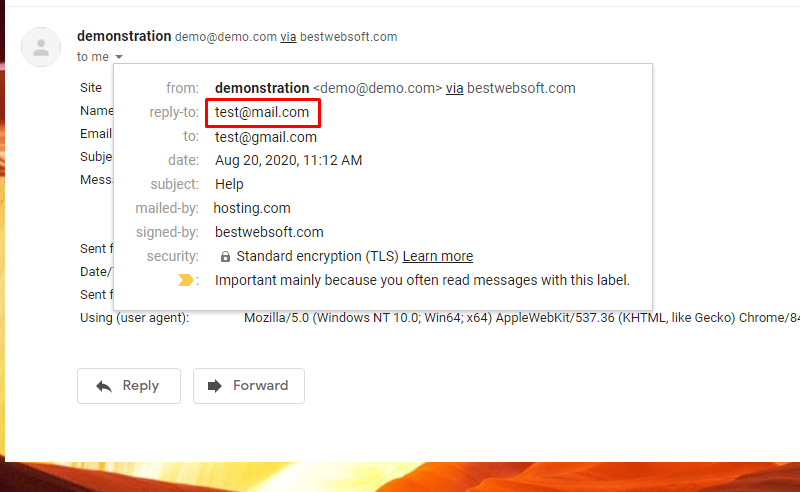
3.3. Add Field ‘Reply-To’ to the Email Header
Enable the “Add field ‘Reply-To’ to the email header” option to set the visibility of a message sender’s email address in the email header.

3.3.1. The email address will be displayed in the “Reply to” details section as follows.
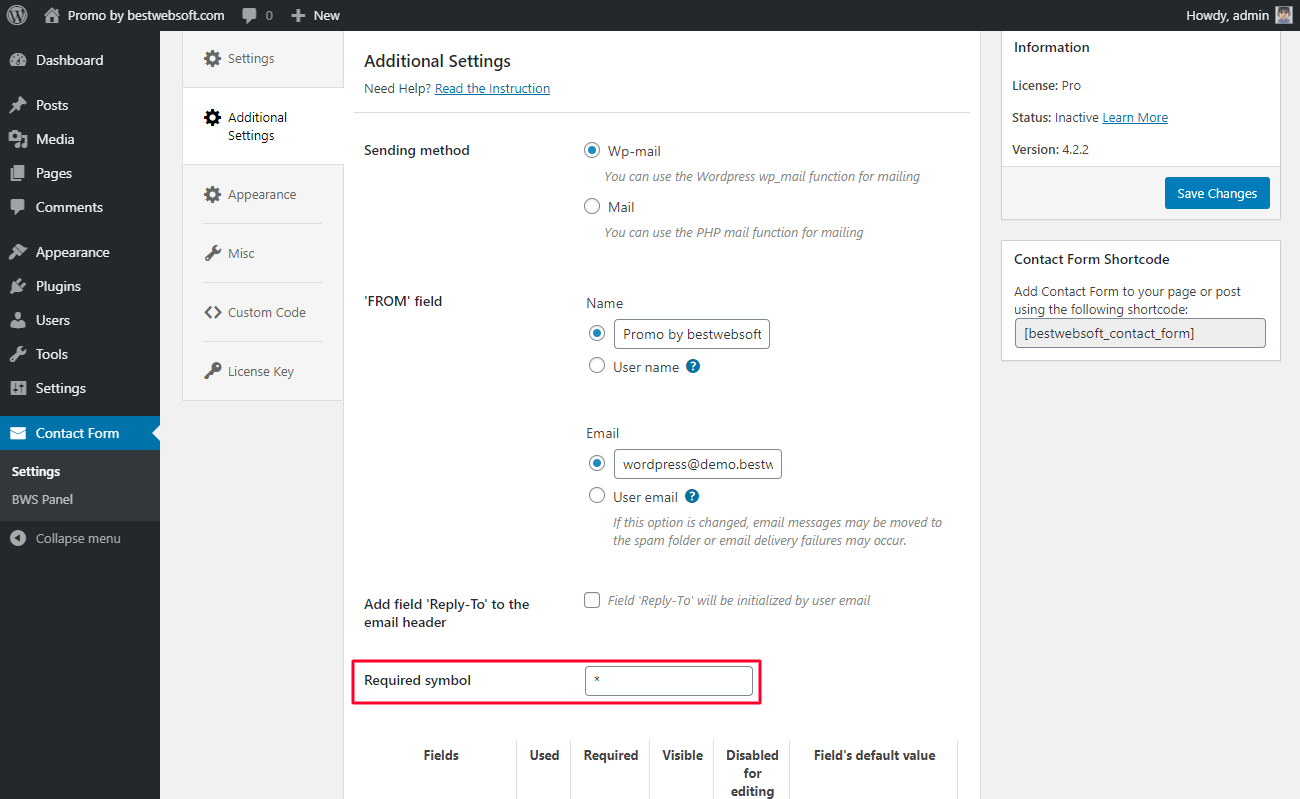
3.4. Required Symbol
Use the “Required symbol” option to add a symbol used to mark the required fields. The “*” symbol is set by default.
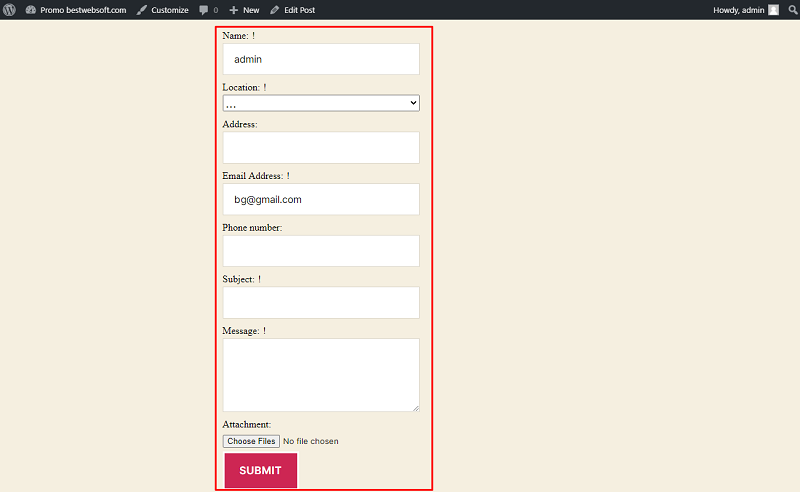
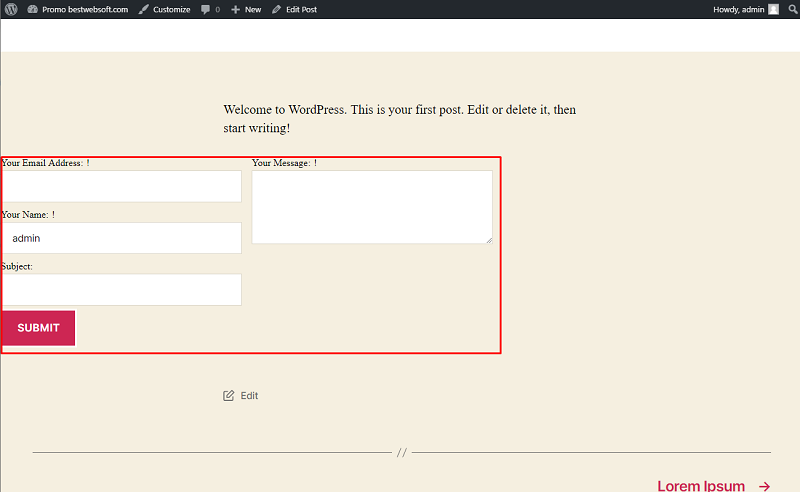
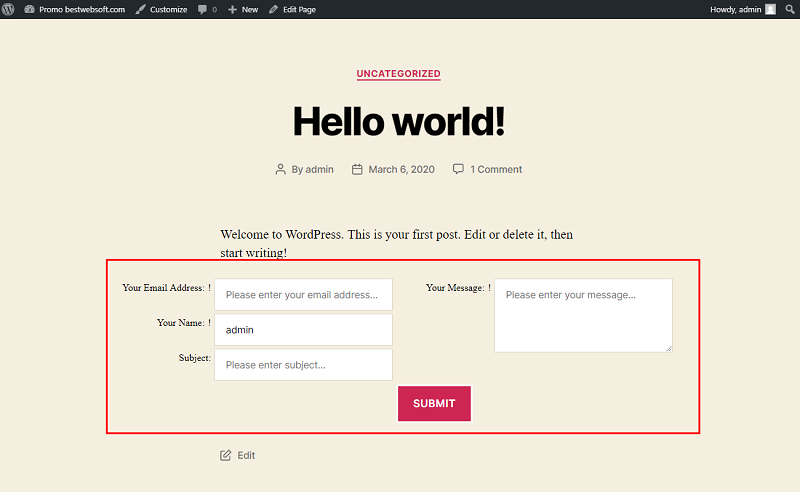
3.4.1. The default symbol is changed to “!” will look at the contact form as follows.

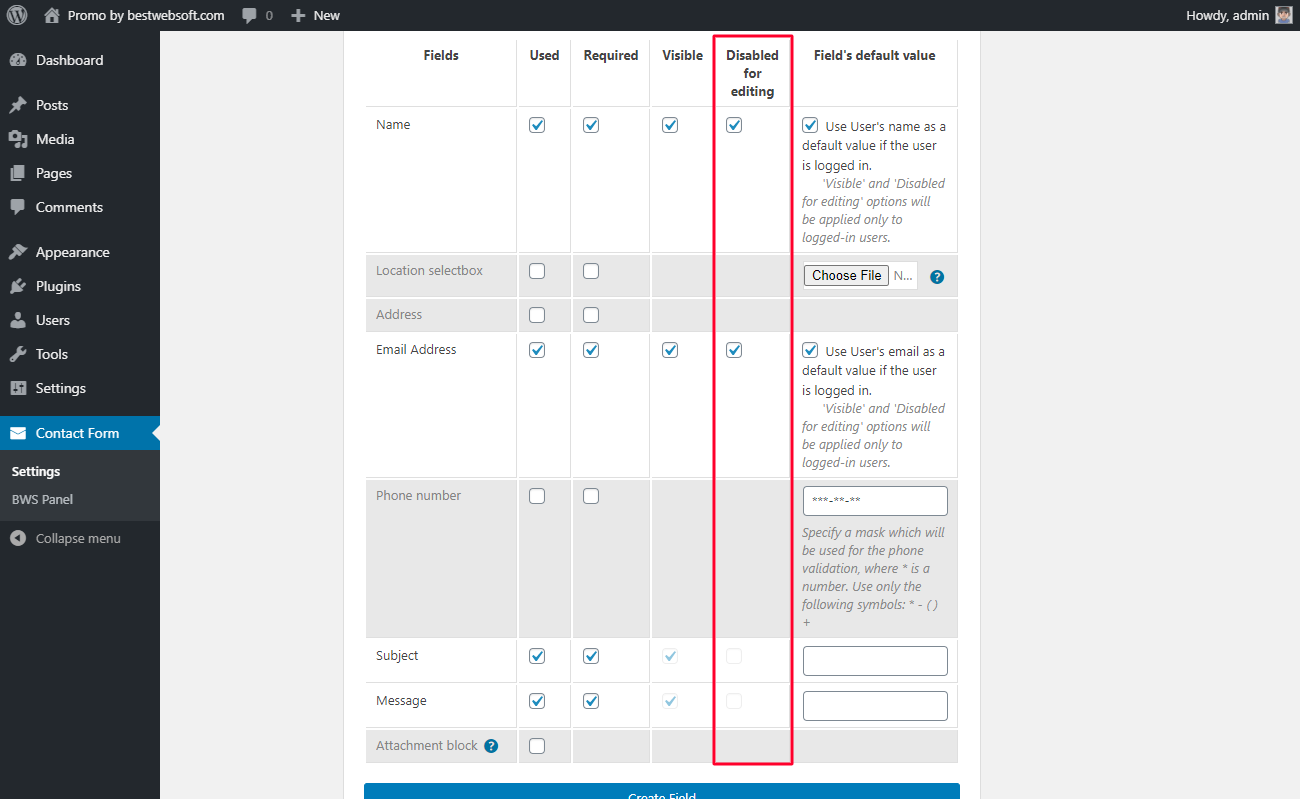
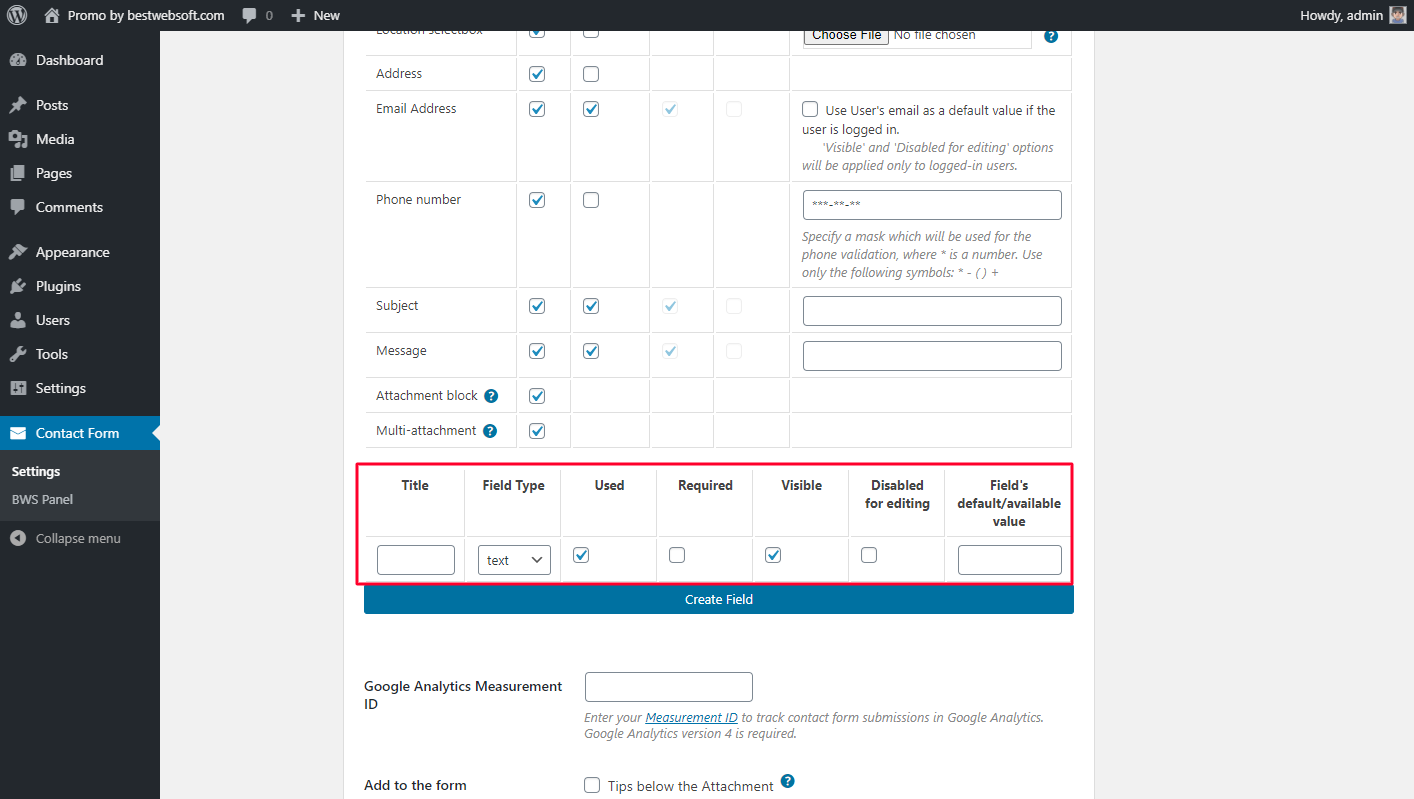
3.5. Fields Settings
Use the table with field settings to customize the fields of the Contact Form.

3.5.1. Use the “Used” column to enable or disable the fields, the user may skip while filling the contact form out.

3.5.2. Use the “Required” column to enable or disable the fields designated for obligatory filling out.

3.5.3. Use the “Visible” column to enable or disable fields that will be visible in the contact form.

3.5.4. Use the “Disabled for editing” column to enable or disable fields that will be forbidden for filling out.
3.5.5. Use the “Field's default value” column to enable or disable fields default values, enter default values, change phone number mask, and choose the file for the “Location selectbox”.
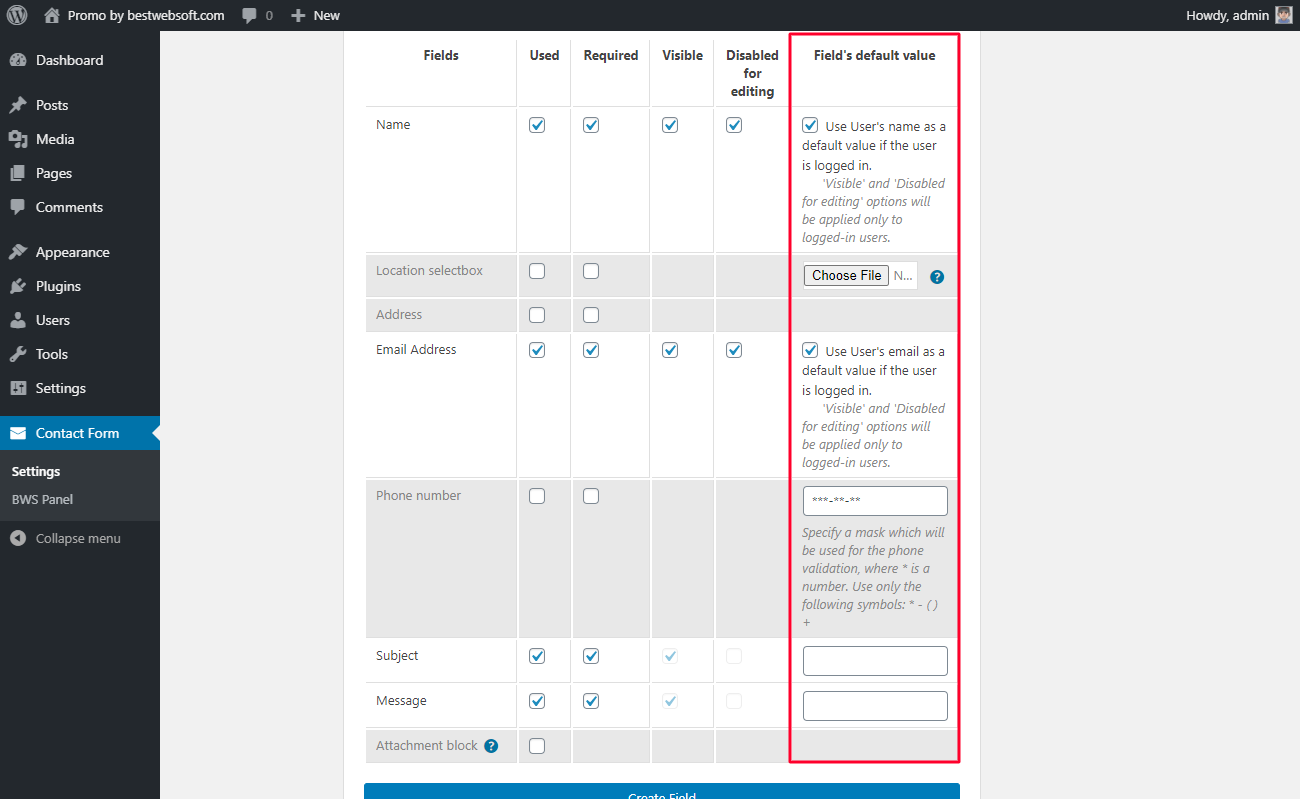
3.5.6. Enable the “Attachment block” to allow users to attach the files to the contact form. Enable the “Multi-attachment” for multiple file selection.
Note: Users can attach the following file formats: html, txt, css, gif, png, jpeg, jpg, tiff, bmp, ai, eps, ps, csv, rtf, pdf, doc, docx, xls, xlsx, zip, rar, wav, mp3, ppt, aar, sce |

3.5.7. A customized contact form may look on a page as follows.
3.6. Create Field
Click the “Create Field” button in order to create a custom field that will be displayed in the contact form.

3.6.1. Define the field settings adding it into the attachment block and click the “Create Field” button.
3.6.2. Created “Text” field type may look on the contact form as follows.

3.6.3. The created “Textarea” field type may look on the contact form as follows.

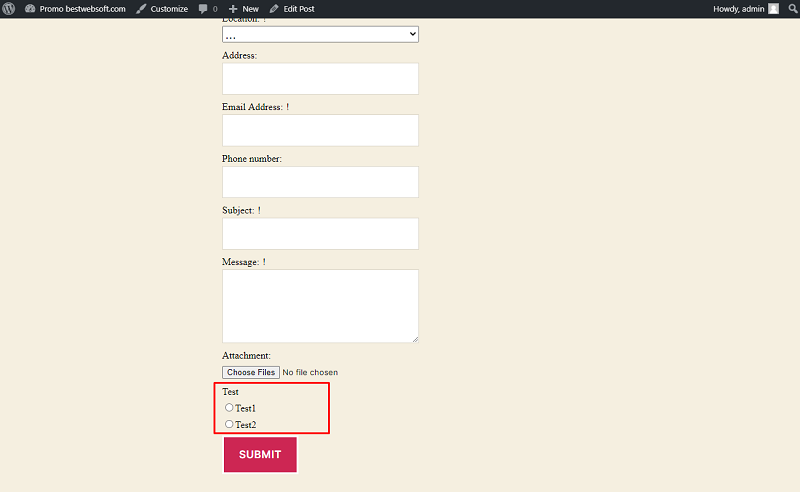
3.6.4. Created “Radio” field type may look on the contact form as follows.
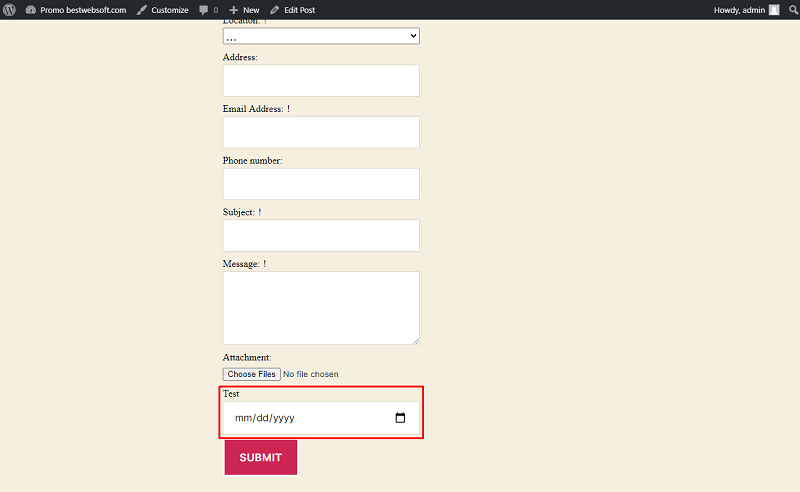
3.6.5. Created “Date” field type may look on the Contact Form as follows.
3.6.6. Created “Time” field type may look on the Contact Form as follows.

3.6.7. Created “Number” field type may look on the contact form as follows.

3.7. Google Analytics Measurement ID
Use the “Google Analytics Measurement ID” field to enter your Measurement ID to track contact form submissions in Google Analytics.

3.7.1. Open your Google Analytics Account and find button “Admin”

3.7.2. Select the “Property” column, in it select the item “Data Streams”.

3.7.3. Choose the necessary stream from the “Data Streams” list.

3.7.4. Copy the “Google Analytics Measurement ID”.

3.7.5. Paste the “Google Analytics Measurement ID” into the input field.

3.8. Add to the Form
Use the “Add to the form” option to enable displaying additional forms on the contact form.

3.8.1. Add Tips Below the Attachment
Enable the “Tips below the Attachment” in order to display tips with allowed attachment file formats.
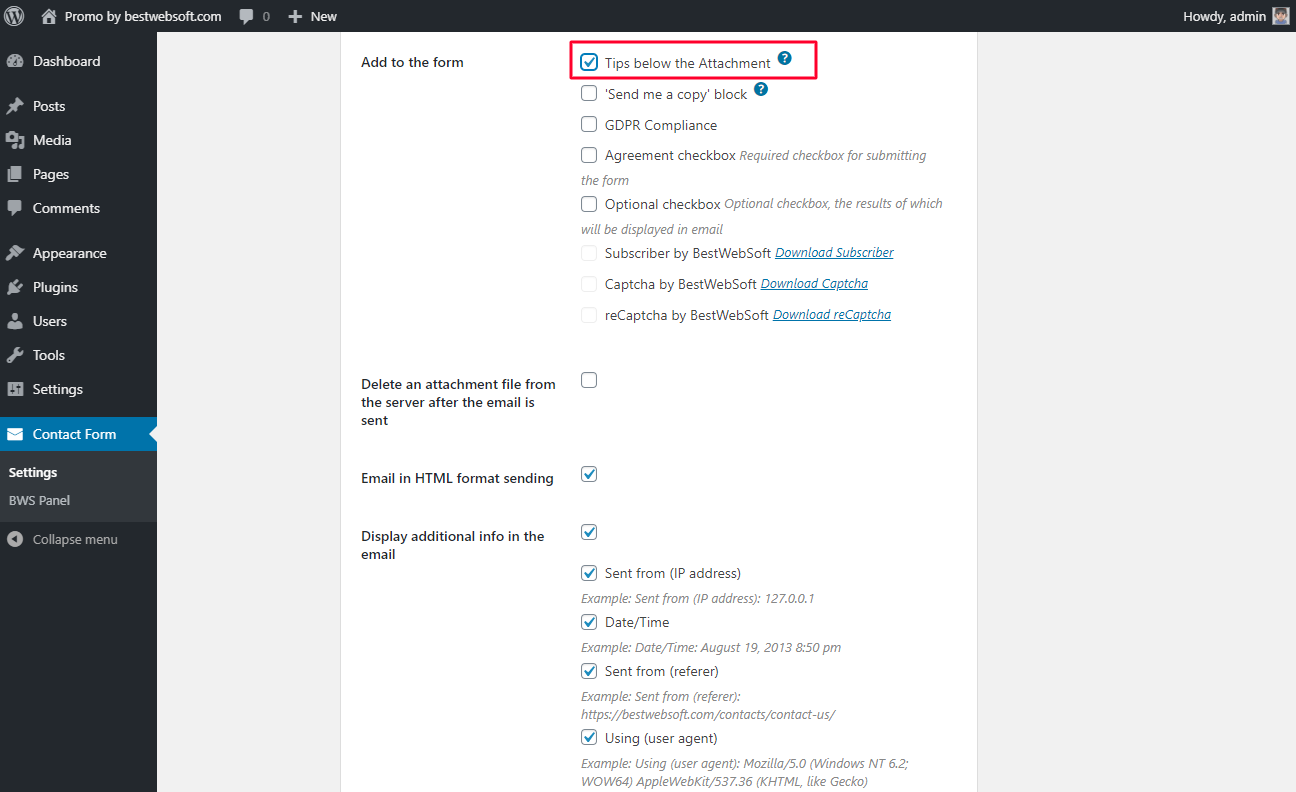
3.7.1.1. Tips below the attachment will look on the contact form as follows.

3.8.2. 'Send Me a Copy' Block
Enable the “'Send me a copy' block” to provide users the opportunity of getting email copies.
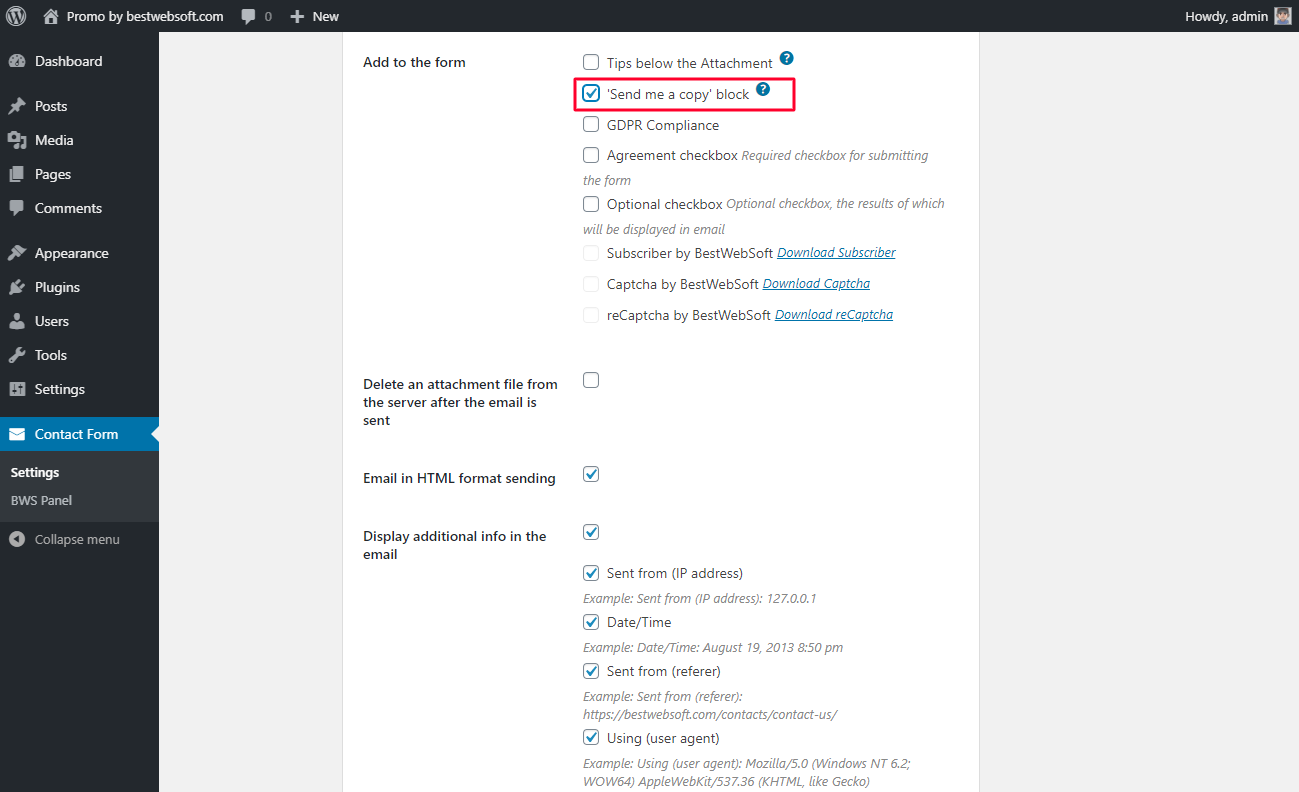
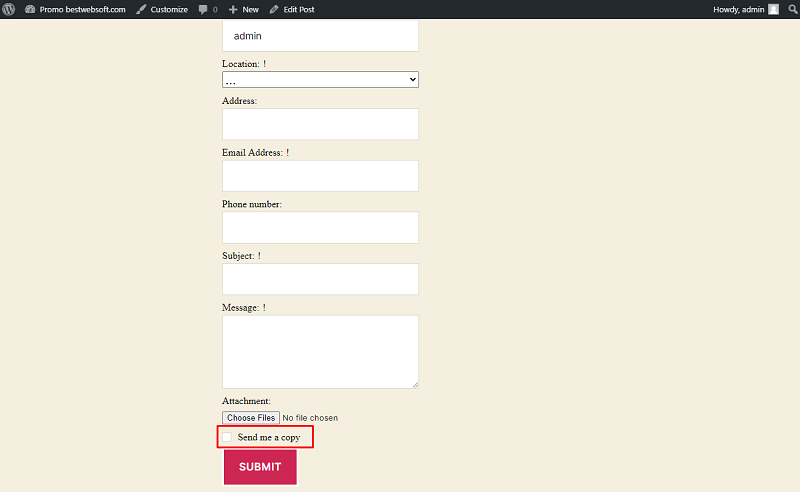
3.8.2.1. The “'Send me a copy' block” will look on the contact form as follows.
3.8.3. GDPR Compliance
Enable the “GDPR Compliance” in order to provide users with the ability to confirm their consent with the Privacy Policy.
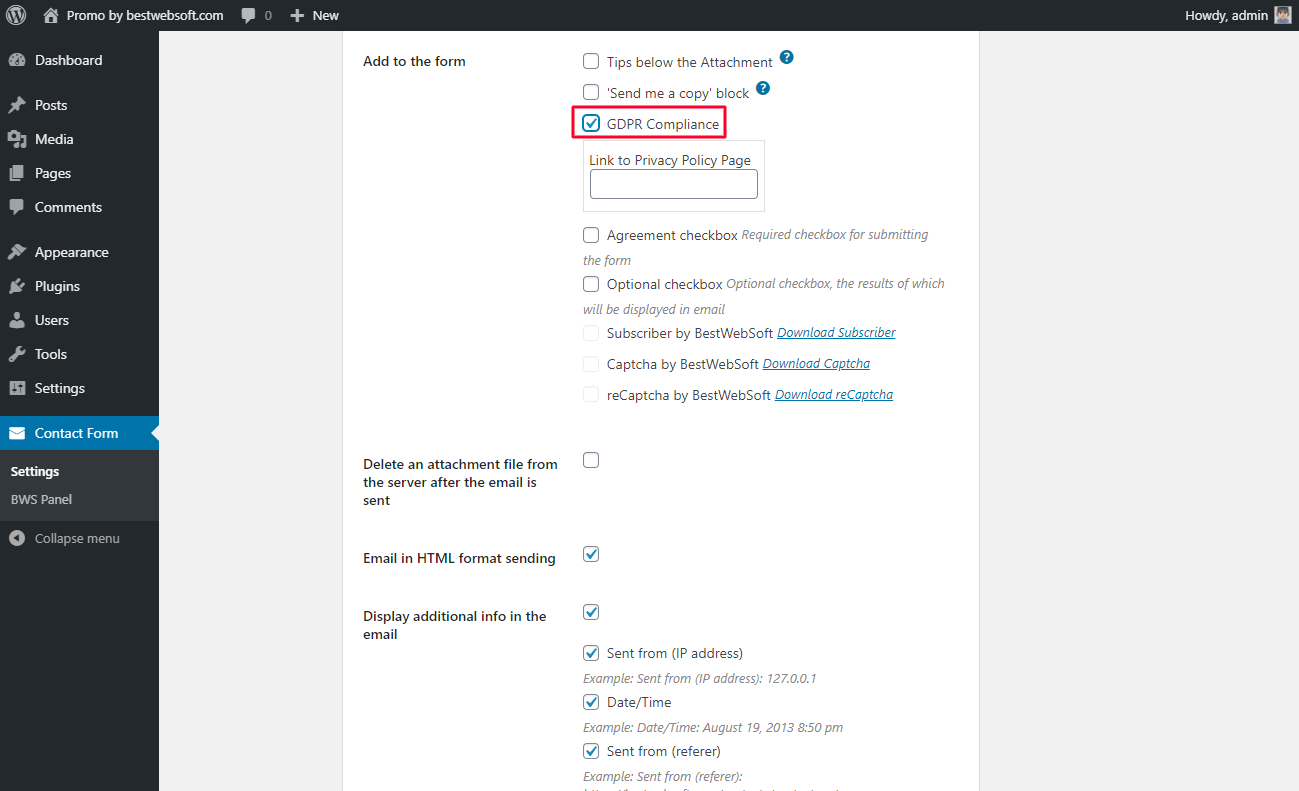
3.8.3.1. Insert a link to the existing Privacy Policy page into the field “Link to Privacy Policy Page”.
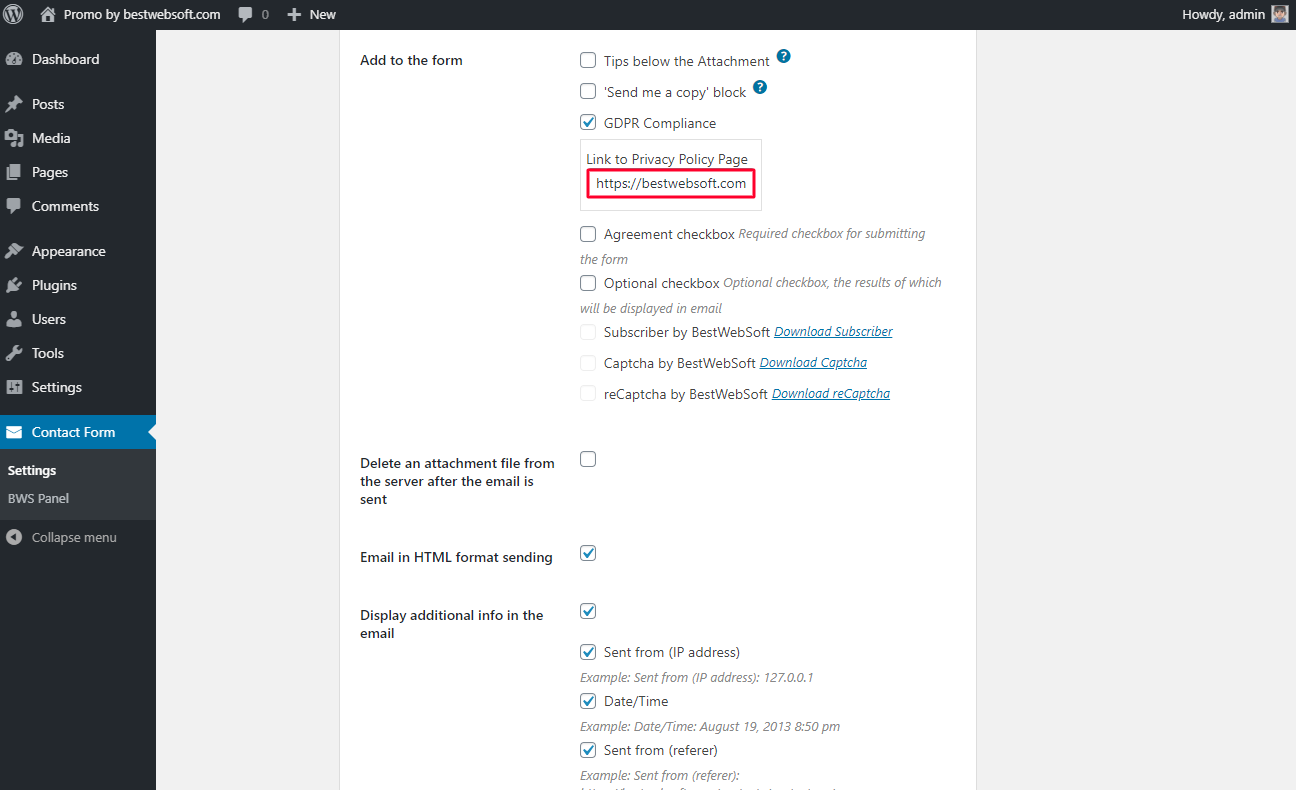
3.8.3.2. The “GDPR Compliance” will look at the contact form as follows.

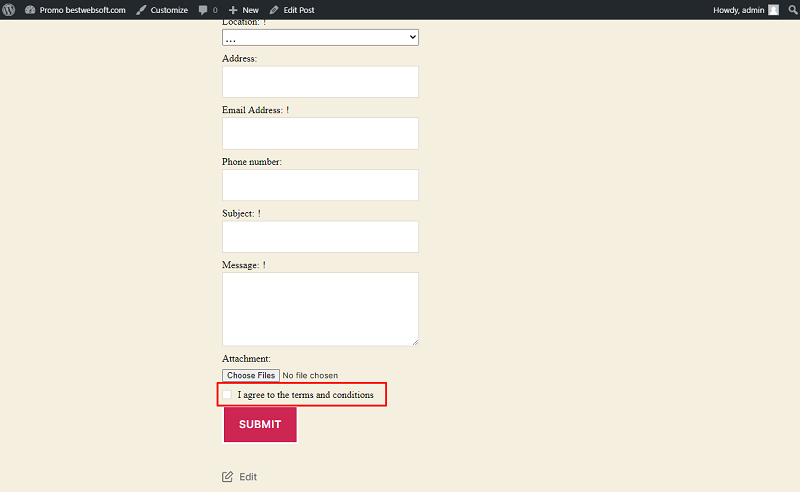
3.8.4. Agreement Checkbox
Enable the “Agreement checkbox” to add the checkbox, without a link to the Privacy Policy page.

3.8.4.1. The “Agreement checkbox” will look at the contact form as follows.
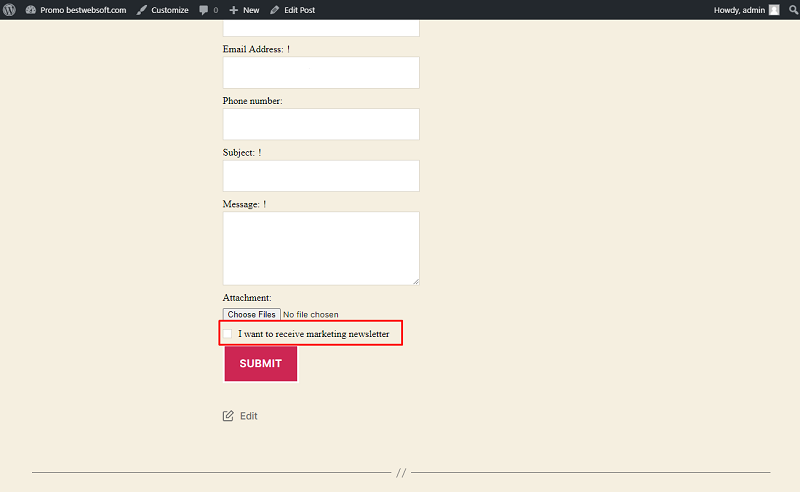
3.8.5. Optional Checkbox
Enable the “Optional checkbox” to add a checkbox with a customizable title, the results of which will be displayed in email.
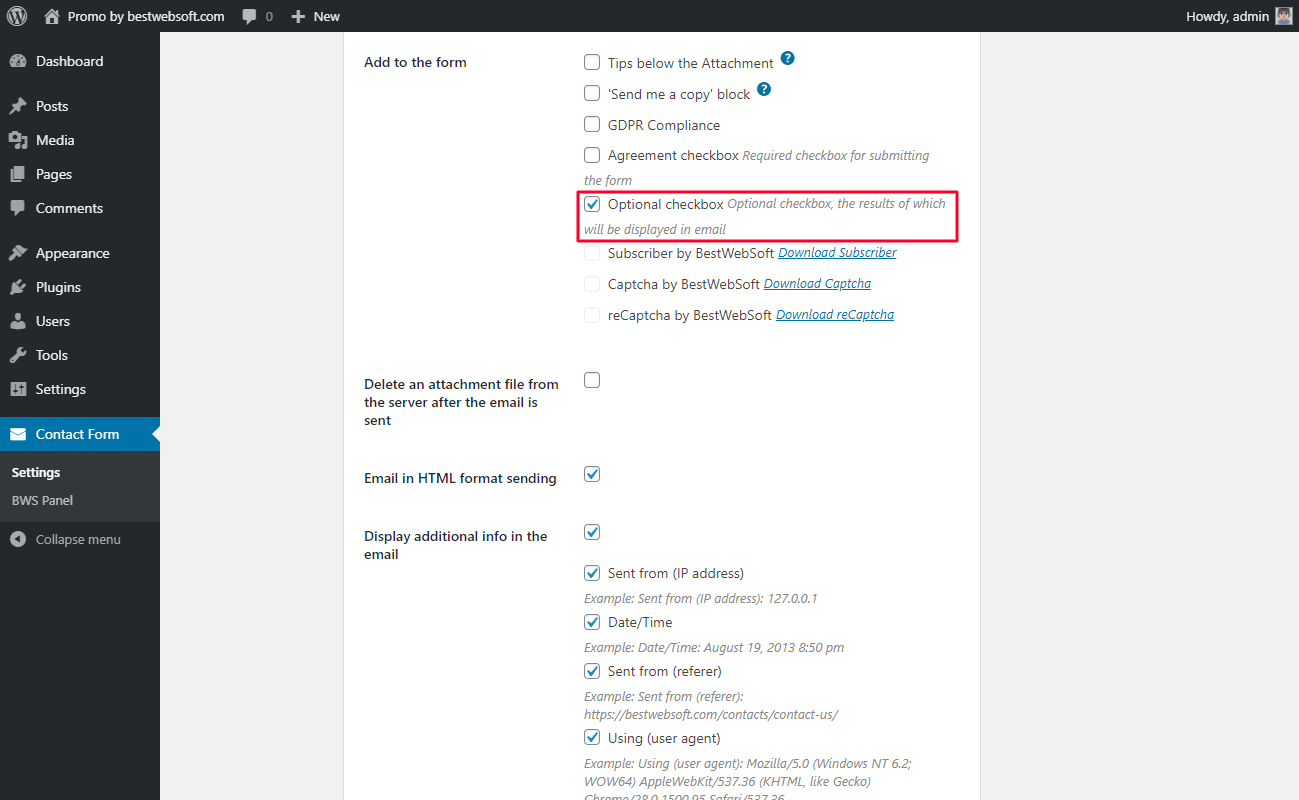
3.7.5.1. The “Optional checkbox” will look at the contact form as follows.
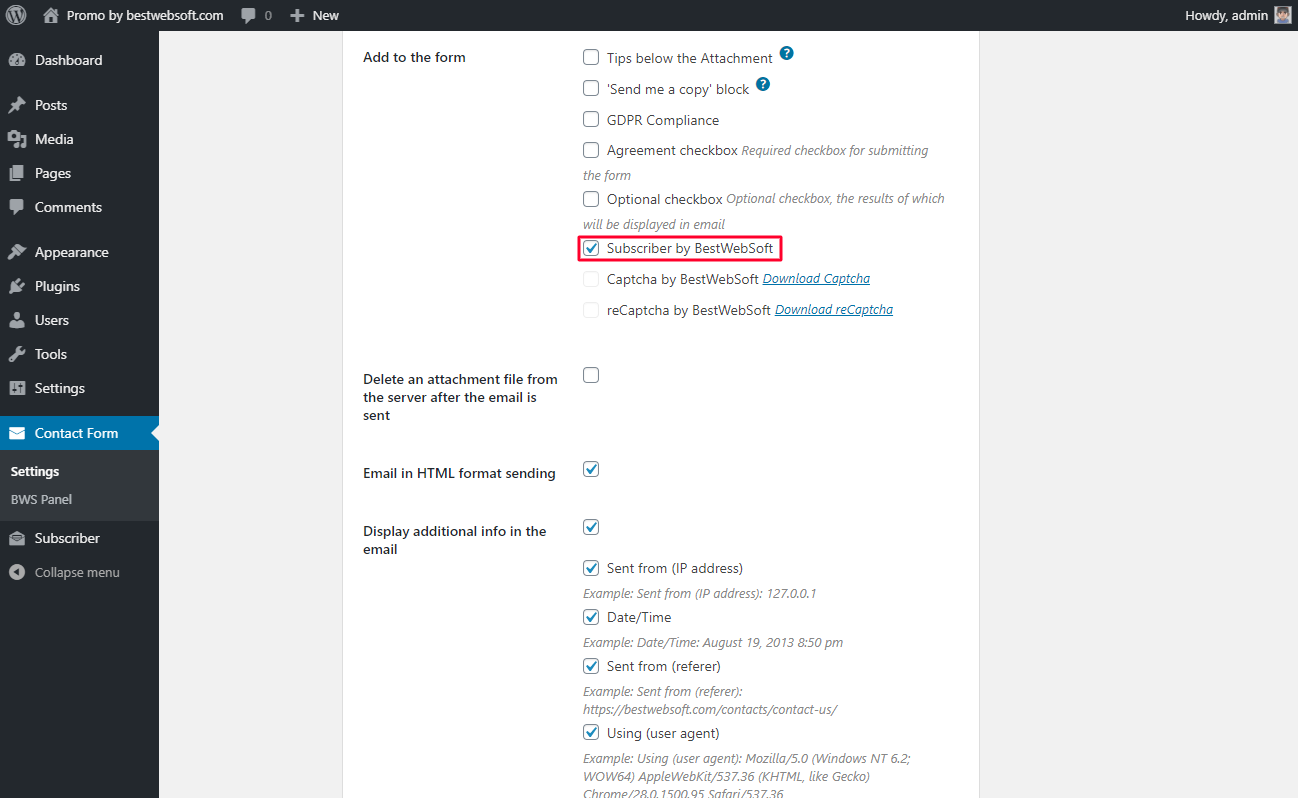
3.8.6. Subscriber by BestWebSoft
Contact Form by BestWebSoft is compatible with Subscriber by BestWebSoft plugin. This plugin will allow users to subscribe to newsletters while filling a contact form out.
You can download the Subscriber plugin here: https://bestwebsoft.com/products/wordpress/plugins/subscriber/.
3.8.6.1. After download and activation of the Subscriber plugin, enable the “Subscriber by BestWebSoft” to add the “Subscribe” checkbox to Contact Form.
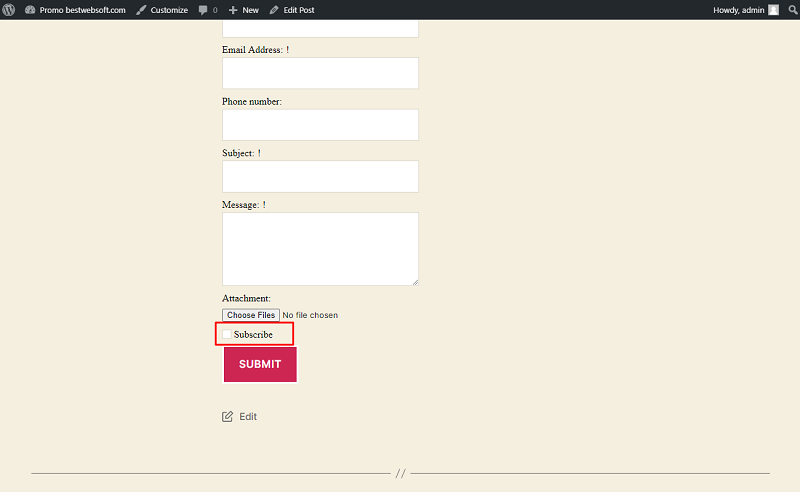
3.8.6.2. The “Subscribe” checkbox will look at the contact form as follows.
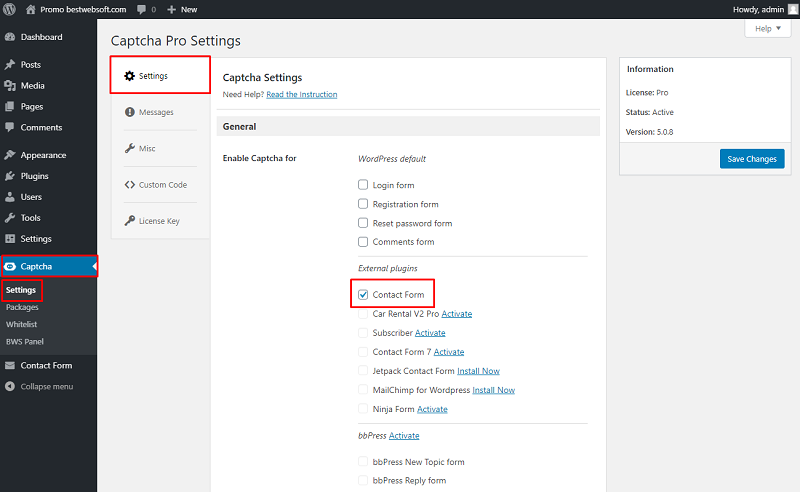
3.8.7. Captcha by BestWebSoft
Contact Form by BestWebSoft is compatible with Captcha Pro by BestWebSoft plugin. This plugin will protect the contact form from spam entries.
You can download the Captcha Pro plugin here: https://bestwebsoft.com/products/wordpress/plugins/captcha/.
3.8.7.1. After download and activation of the “Captcha Pro” plugin, enable the “Captcha by BestWebSoft” to add the Captcha to the contact form.

3.7.7.2. Open the “Captcha” plugin settings page and enable the “Contact Form” on the “External Plugins” section and save changes.
3.7.7.3. The “Captcha” on the contact form may look as follows.

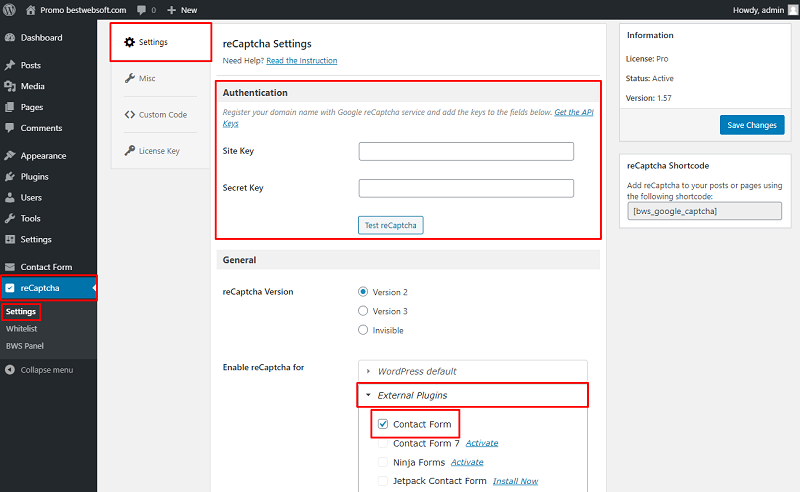
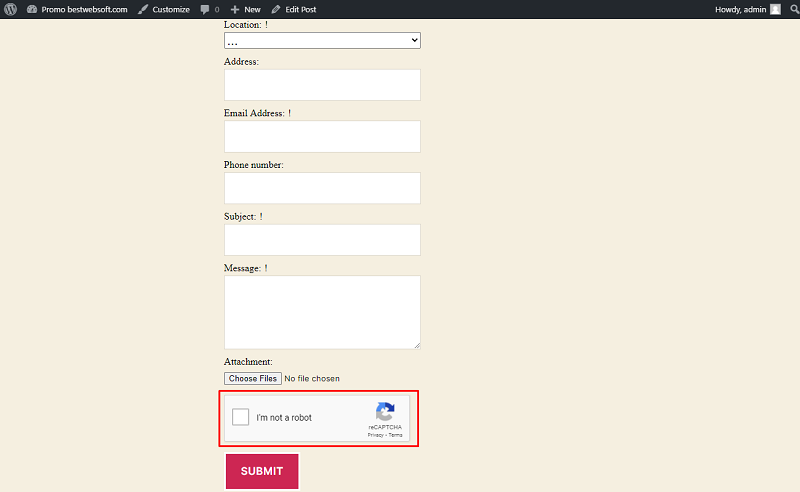
3.8.8. reCaptcha by BestWebSoft
Contact Form by BestWebSoft is compatible with reCaptcha Pro by BestWebSoft plugin. This plugin will protect the contact form from spam entries and uses Google API.
You can download the reCaptcha Pro plugin here: https://bestwebsoft.com/products/wordpress/plugins/google-captcha/.
3.8.8.1. After download and activation of the “reCaptcha Pro” plugin, enable the “reCaptcha by BestWebSoft” to add the reCaptcha to contact form.

3.8.8.2. Open the “reCaptcha” plugin settings page receive "Site Key” and “Secret Key”
and then enable the “Contact Form” on the “External Plugins” section and save changes.
Note: Check out the reCaptcha User Guide for instructions on obtaining "Site Key” and “Secret Key” and other settings for the reCaptcha plugin: |
3.7.8.3. The “reCaptcha” on the contact form may look as follows.
3.9. Delete an Attachment File From the Server After the Email is Sent
Enable “Delete an attachment file from the server after the email is sent” option in order to activate the deleting an attachment file from the server after the email is sent.

3.10. Email in HTML Format Sending
Enable “Email in HTML format sending” option to get emails in HTML format.

3.10.1. Emails with enabled “Email in HTML format sending” option will look as follows.

3.10.2. Emails with disabled “Email in HTML format sending” option will look as follows.
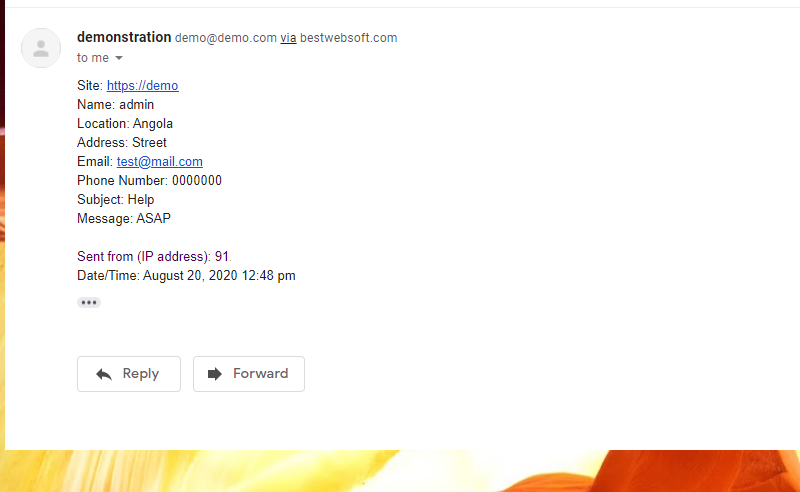
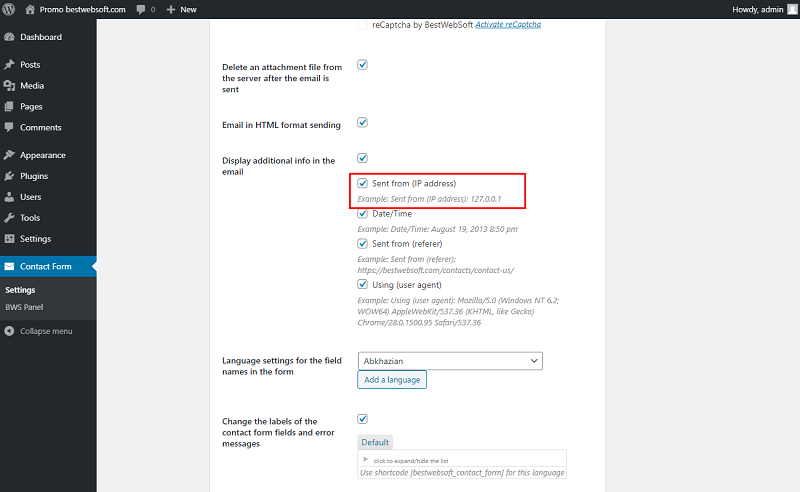
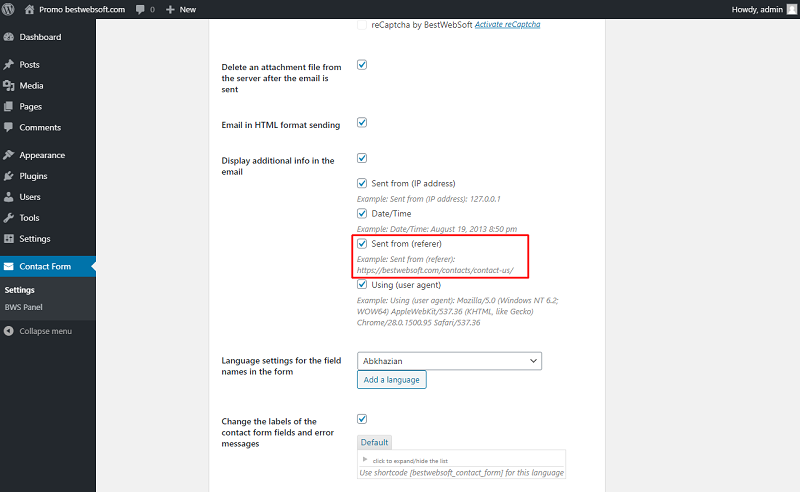
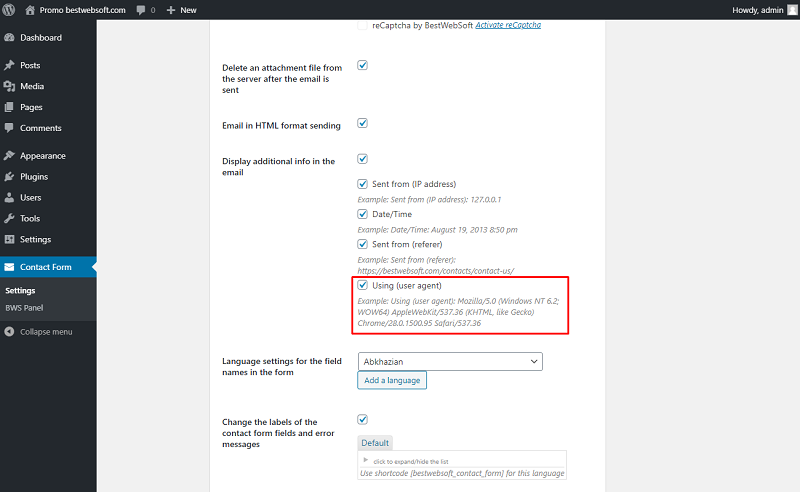
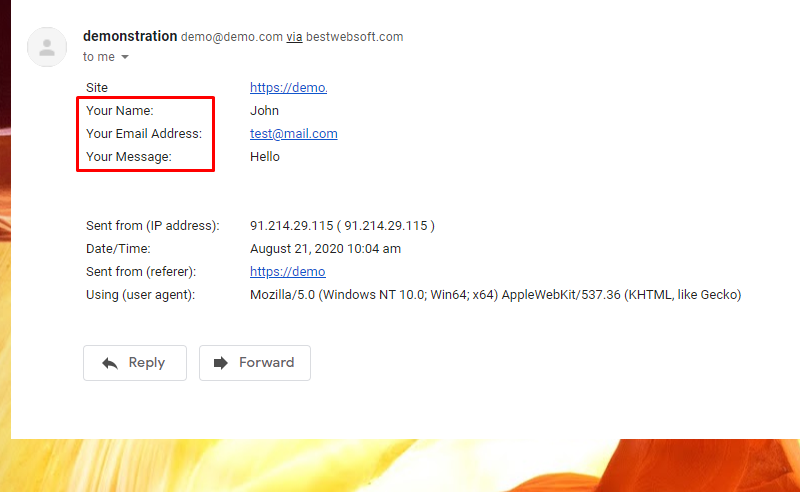
3.11. Display Additional Info in the Email
Use the “Display additional info in the email” option to enable the additional information displayed in emails.

3.11.1. Enable the “Sent from (IP address)” to make the IP address of the sender visible in emails.
3.11.2. Enable the “Date/Time” to have the date and time displayed in emails.

3.11.3. Enable the “Sent from (referrer)” to make a referrer be displayed in emails.
3.11.4. Enable the “Using (user agent)” to have a user’s agent displayed in emails.
3.11.5. The email with additional info will look as follows:

3.12. Language Settings for the Field Names in the Form
Use the “Language settings for the field names in the form” option in order to add the new language and change the labels of the contact form fields.
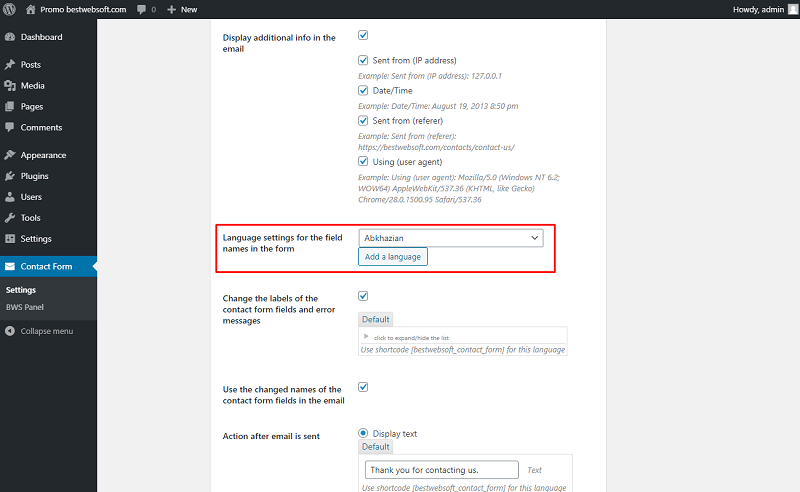
3.12.1. Select the preferred language from the drop-down list and click the “Add a language” button.

3.12.2. This will duplicate the contact form template in the chosen language in “Change the labels of the contact form fields and error messages” option, enabling you to change the field names in each template separately.

3.13. Change the Names of the Contact Form Fields and Error Messages
Enable the “Change the names of the contact form fields and error messages” option change the titles and add translations to added languages to the contact form,
Note: The fields are not translated into a chosen language automatically. Write the field names in the chosen language of each template by necessity. |

3.13.1. Click the arrow to expand the list in order to change the titles for the “Default” language.
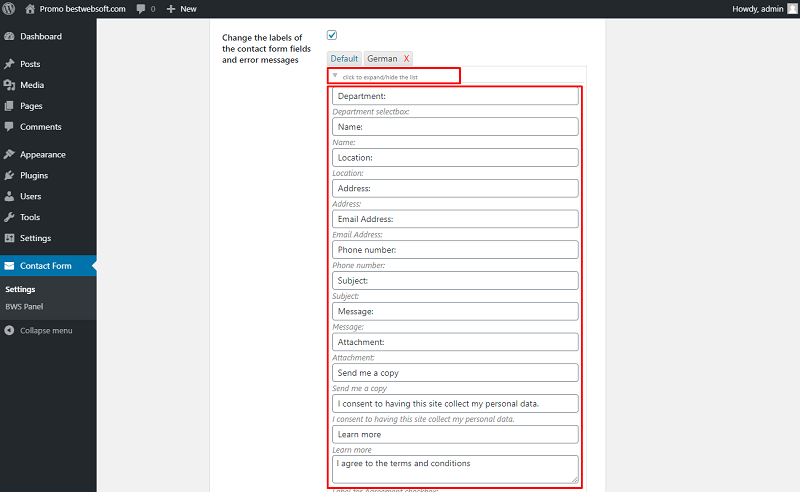
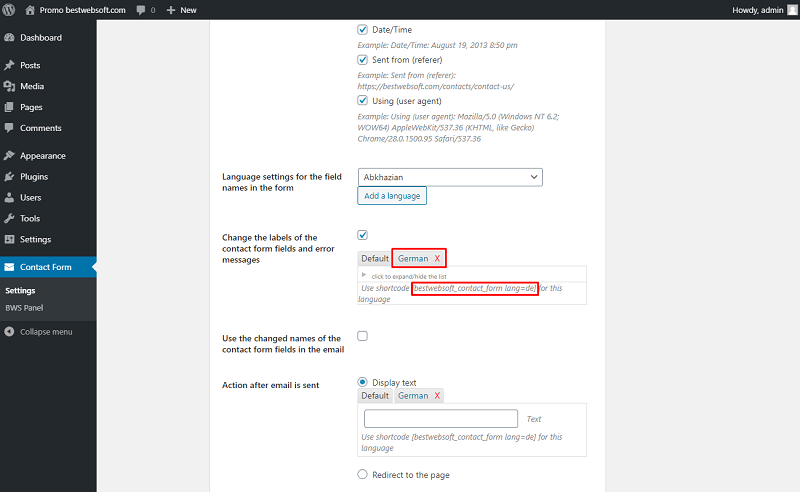
3.13.2. To add the titles for non-default language select the necessary language tab and enter the translated titles into the appropriate fields.

3.13.3. In order to insert a contact form in the alternative language to the page or post, select the necessary language tab, copy it’s shortcode, and paste it to the appropriate place of your post or page.
3.13.4. Contact form with translated titles may look as follows.

3.14. Use the Changed Names of Contact Form Fields in the Email
Enable the “Use the changed names of the contact form fields in the email” option for using the changed names of the contact form fields in emails.

3.14.1. In the email, the changed labels of the contact form will look as follows.
3.15. Action After Email is Sent
Use the “Action after email is sent” change informing text about a successful sending the message or redirect the user to the specified page.

3.15.1. Choose the “Display text” to change informing text about a successful sending the message by entering text in the appropriate field.
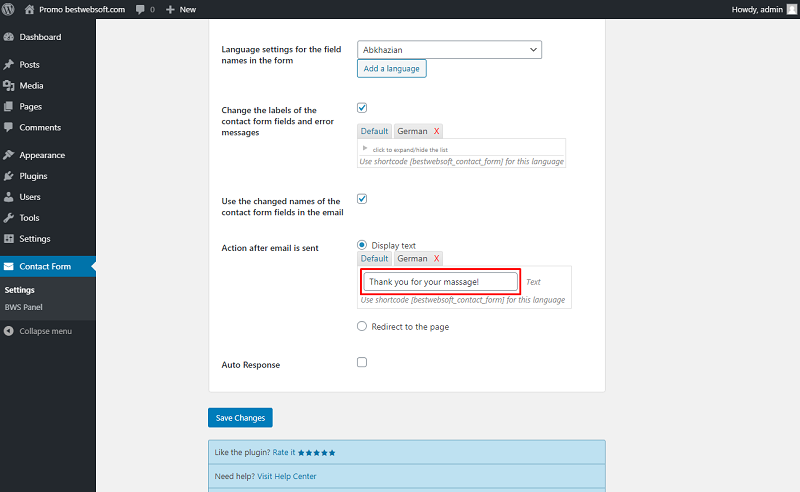
3.15.2. To change informing text about a successful sending the message in an alternative language, select its tab and enter the text in the appropriate field.

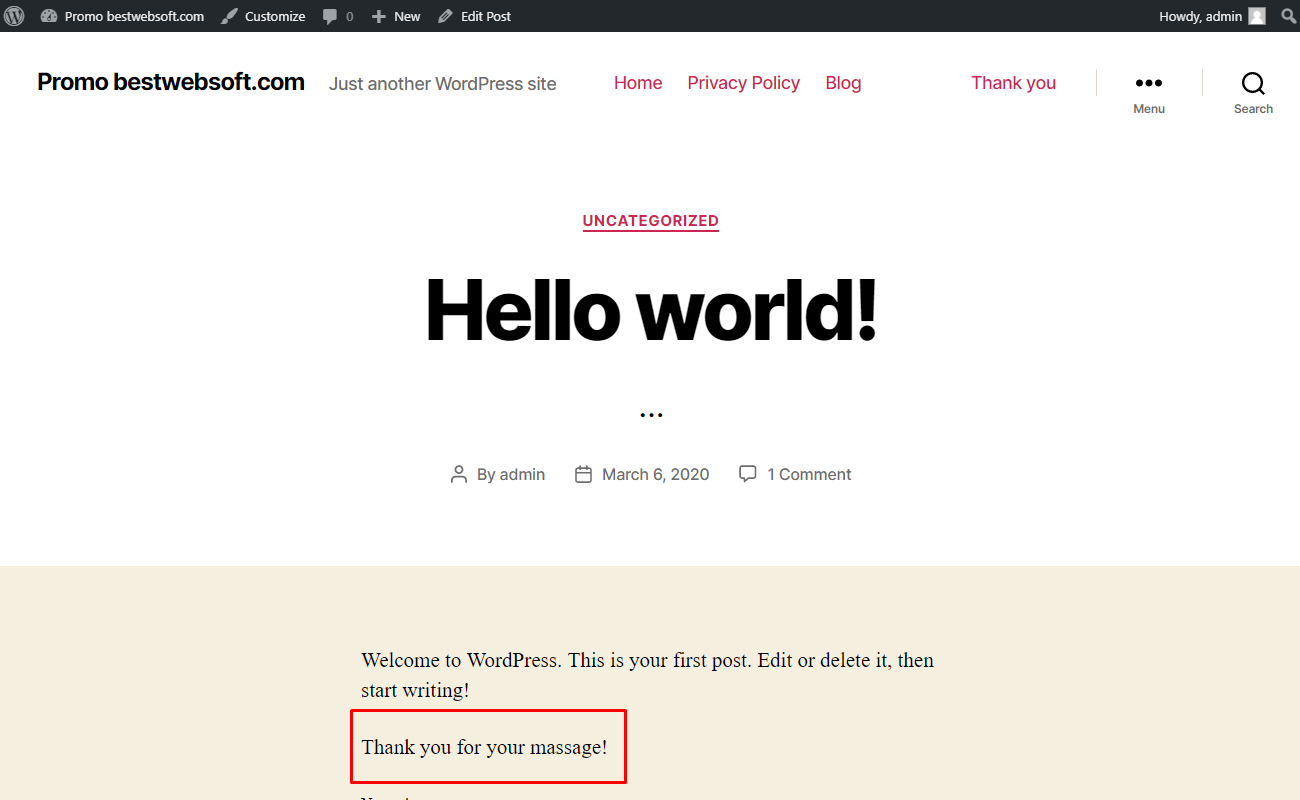
3.15.3. Edited informing text about a successful sending the message may look as follows.
3.15.4. Choose the “Redirect to the page” to insert redirect URL to the specified page after the form is submitted.

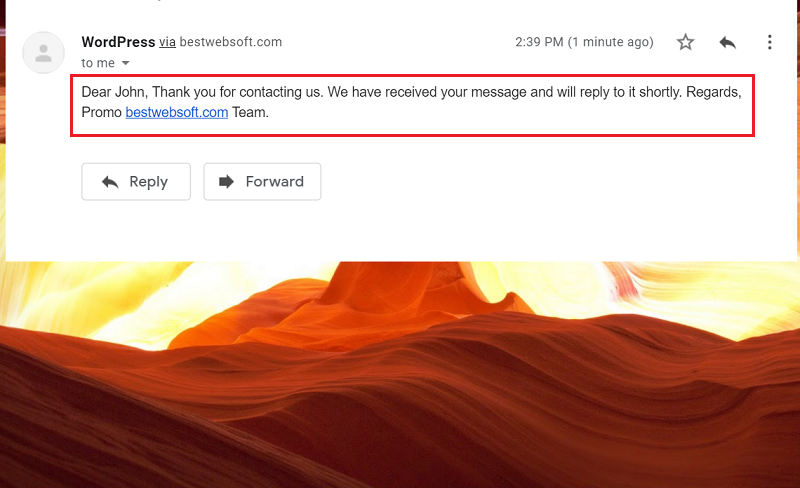
3.16. Auto Response
Enable the “Auto Response” option to adjust the text of the automatic sending of reply-letters to the user’s email address.
Note: Use %%NAME%% to display data from the email field and %%MESSAGE%% to display data from the Message field, as well as %%SITENAME%% to display blog name. |

3.16.1. The automatic response massage, that a user gets in the email will look as follows.
4. Appearance
Use the options of the “Appearance” page to change the appearance of the contact form.
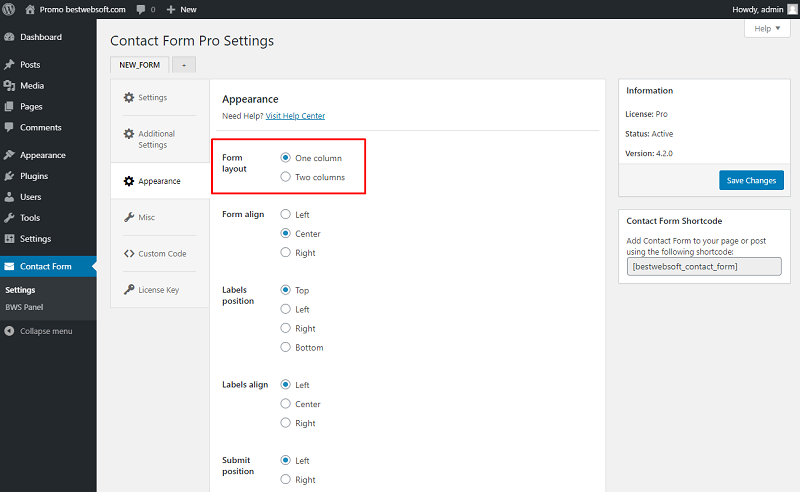
4.1. Form Layout
Use the “Form layout” option to choose the display of contact form in one or in two columns.
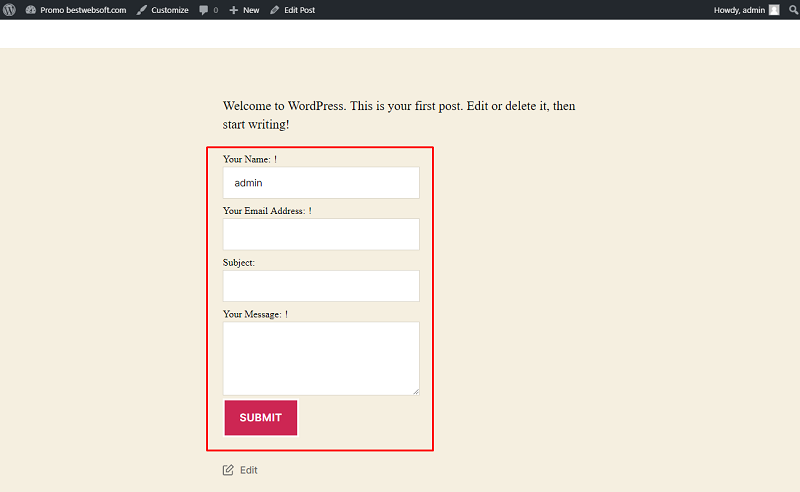
4.1.1. One column form layout will look on a page as follows.
4.1.2. To display two column form layout choose “Two columns” and drag and drop blocks in the “Contact Form | Preview” section to put them in an appropriate order.

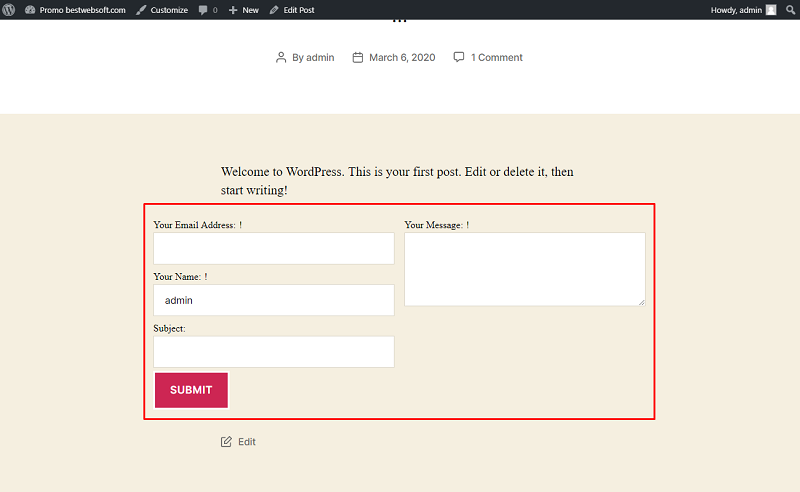
4.1.3. Two column form layout will look on a page as follows.
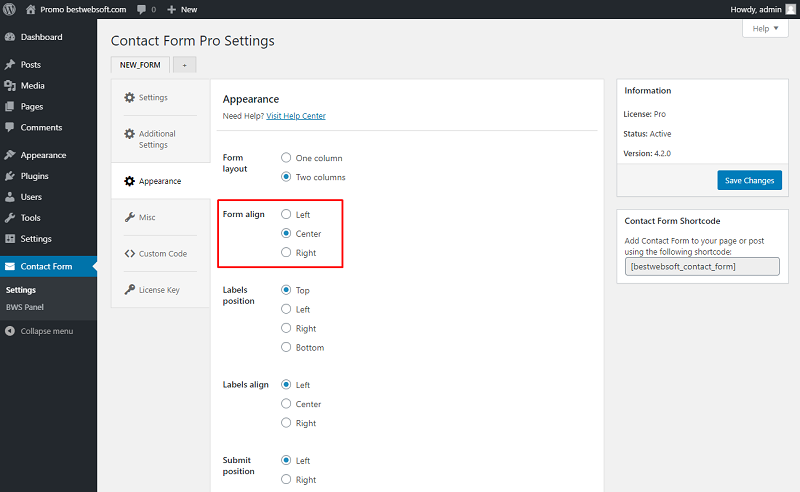
4.2. Form Align
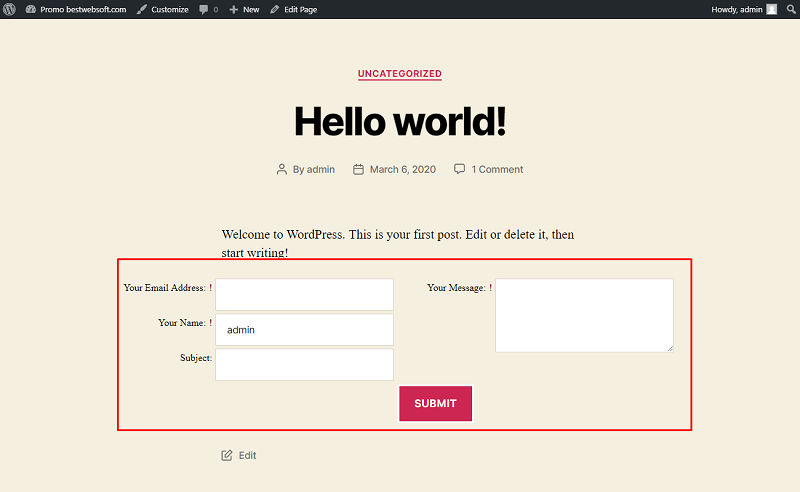
Use the “Form align” option to choose the position of the contact form on a page or post.
4.2.1. Contact form aligned to the “Left” will look as follows.
4.2.2. Contact form aligned to the “Center” will look as follows.

4.2.3. Contact form aligned to the “Right” will look as follows.

Note: If the width of a set contact form is equal to the width of the column, in which it is placed, you won’t notice any changes by applying this option. The changes can be noticed only in case the width of your contact form is different from the column’s width. |
4.3. Labels Position
Use the “Labels position” option to regulate the position of labels in the contact form.

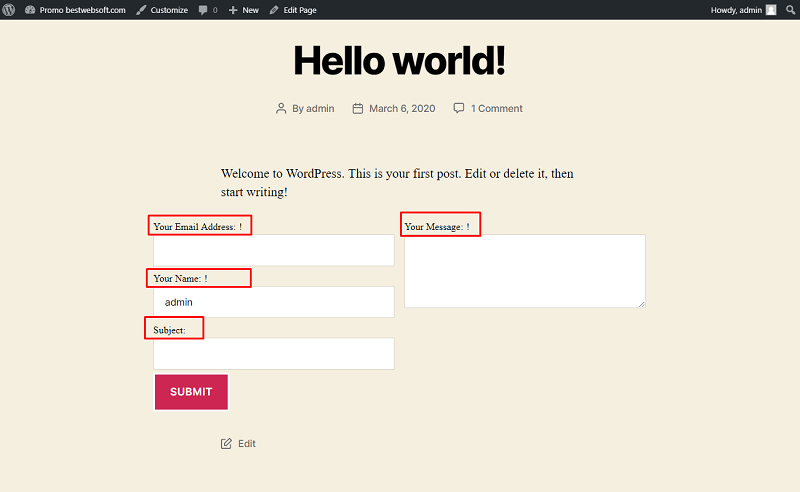
4.3.1. Contact form with labels position on the “Top” will look as follows.
4.3.2. Contact form with labels position on the “Left” will look as follows.
4.3.3. Contact form with labels position on the “Right” will look as follows.

4.3.4. Contact form with labels position on the “Bottom” will look as follows.

4.4. Labels Align
Use the “Labels align” option to choose the alignment of the labels of the contact form.

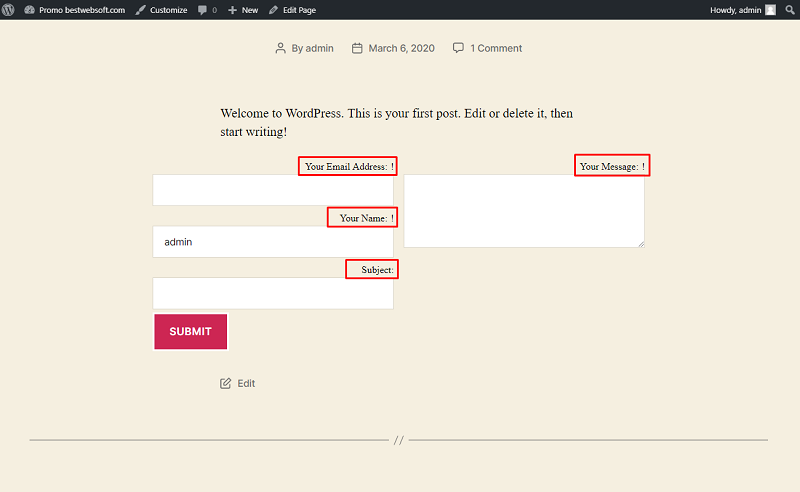
4.4.1. Labels aligned to the “Left” will look on the contact form as follows.

4.4.2. Labels aligned to the “Center” will look on the contact form as follows.

4.4.3. Labels aligned to the “Right” will look on the contact form as follows.
4.5. Submit Position
Use the “Submit position” option to choose the side of the “Submit” button on the contact form.
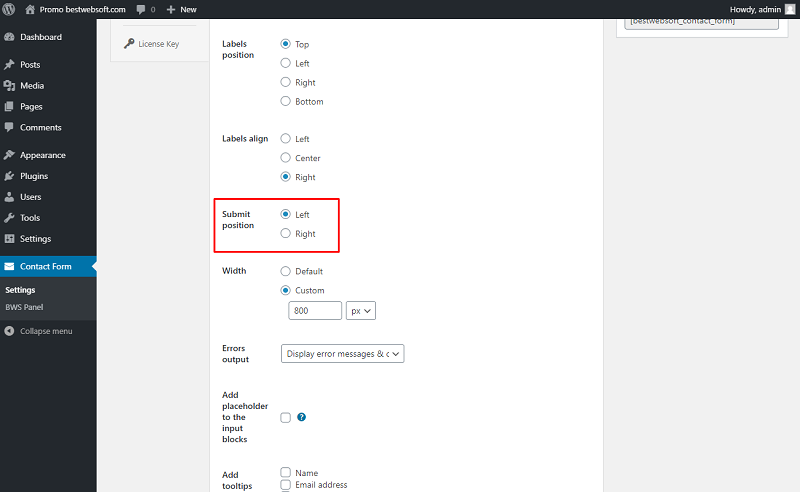
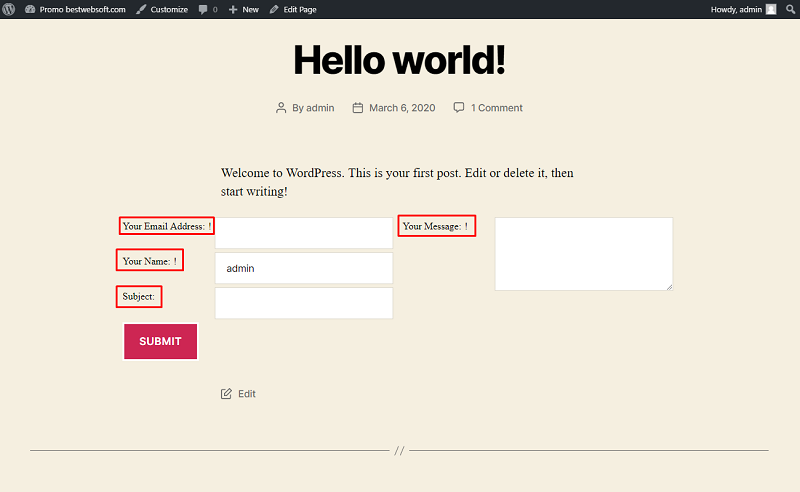
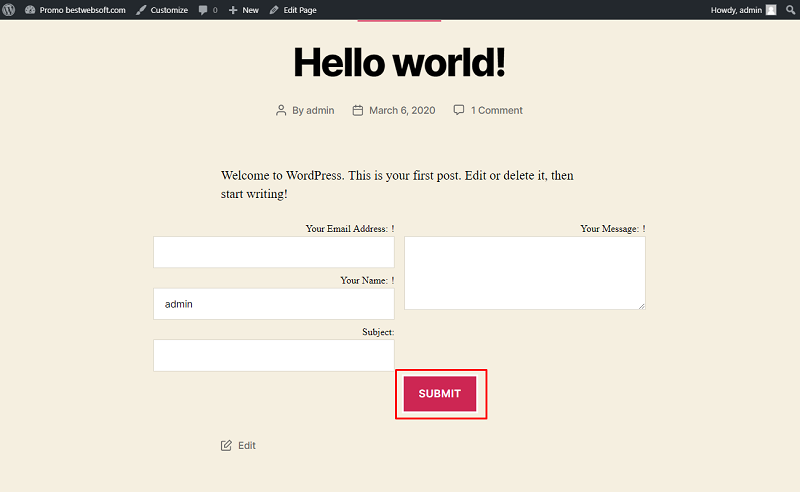
4.5.1. The “Submit” button on the “Left” will look at the contact form as follows.

4.5.2. The “Submit” button on the “Right” will look at the contact form as follows.
4.6. Width
Use the “Width” option to choose between the default width of the form and the custom one.

4.6.1. The contact form with default width will look on a page as follows.
4.6.2. To set the default width choose the “Custom” and set the necessary width in pixels or percents in “Labels” and “Inputs” fields.
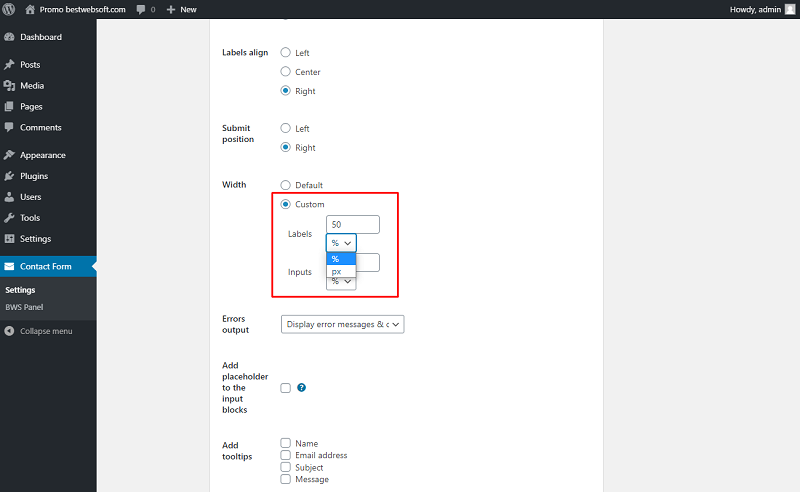
4.6.3. If the width was set for 50%, for example, the contact form will look as follows.

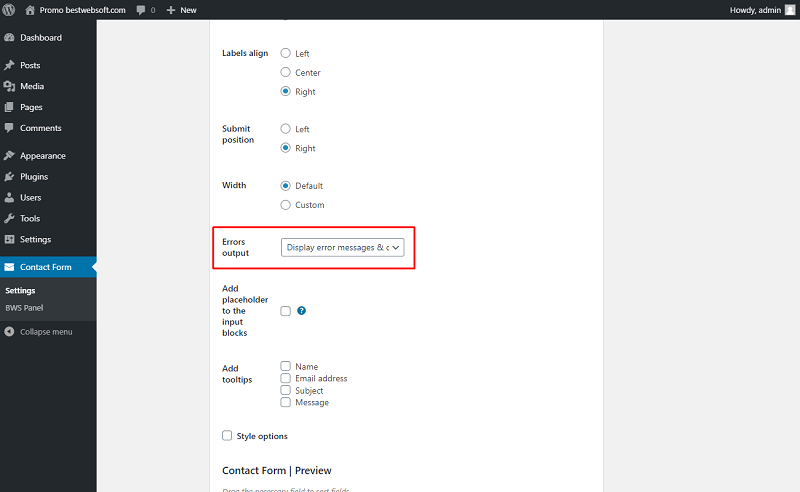
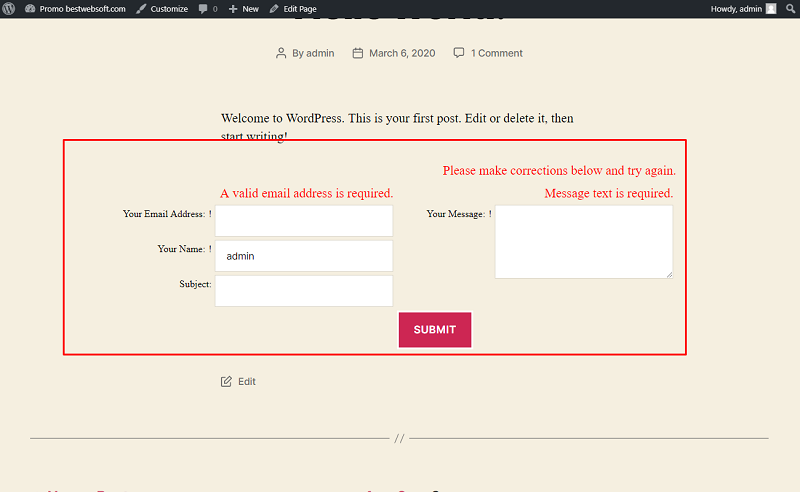
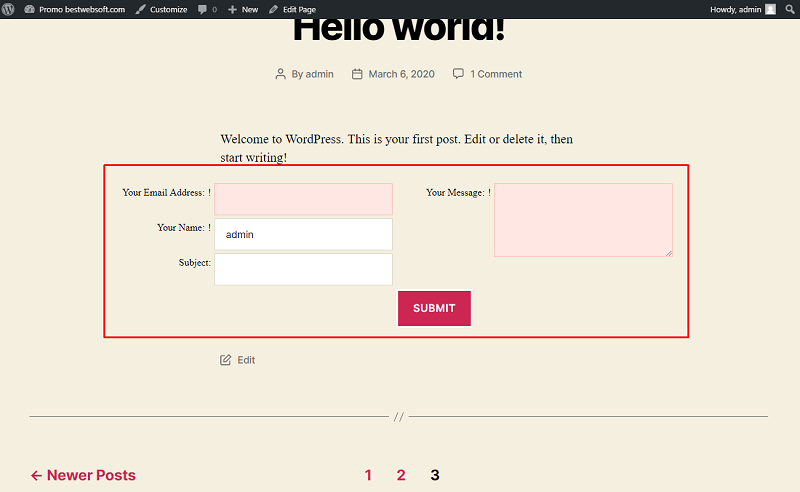
4.7. Errors Output
Use the “Errors Output” option to select the way to display errors on contact form when the field is not filled in or filled with an error.
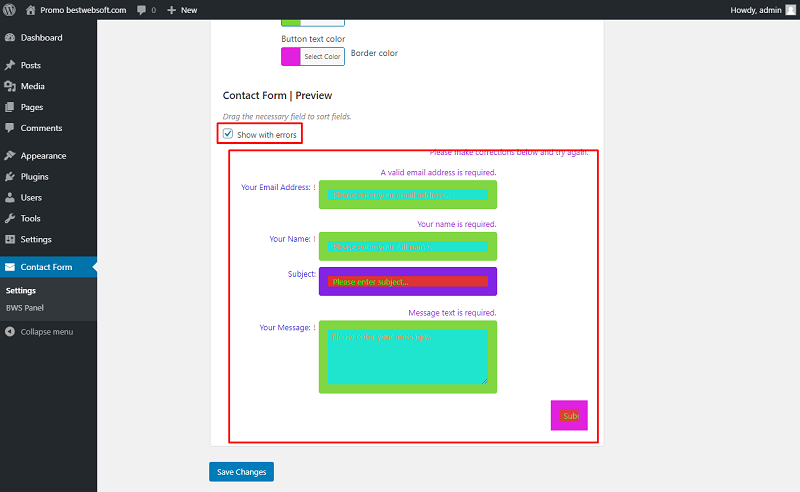
4.7.1. Select the “Display error massages” for informing the user only by means of text messages.

4.7.2. Contact form with error messages will look on a page as follows.
4.7.3. Select the “Color of the input field error” for informing the user by highlighting the fields.

4.7.4. Contact form colored input field errors will look on a page as follows.
4.7.5. Select the “Display error messages and color of the input field errors” for informing the user by both text and highlighting.

4.7.6. Contact form colored input fields and error messages will look on a page as follows.

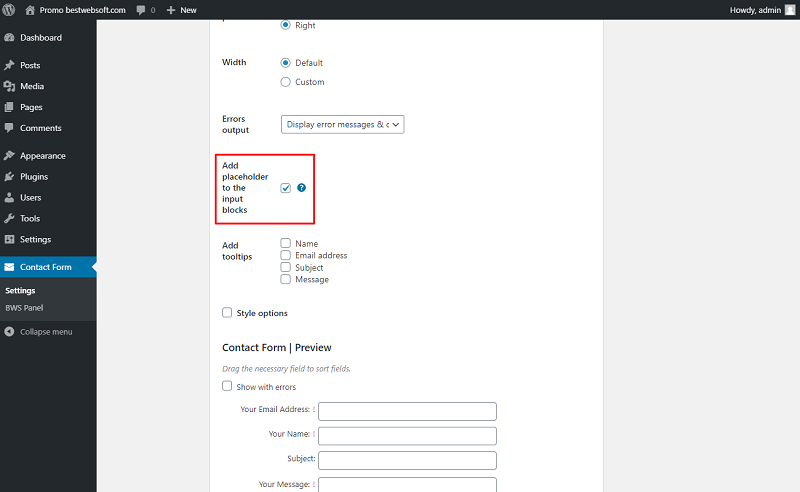
4.8. Add Placeholder to the Input Blocks
Enable the “Add placeholder to the input blocks” option to add explanatory sentences into the input blocks.
Note: You can change placeholders’ text in "Additional settings" -> "Change the labels of the contact form fields and error messages". |
4.8.1. After saving changes the fields of your contact form will look as follows.
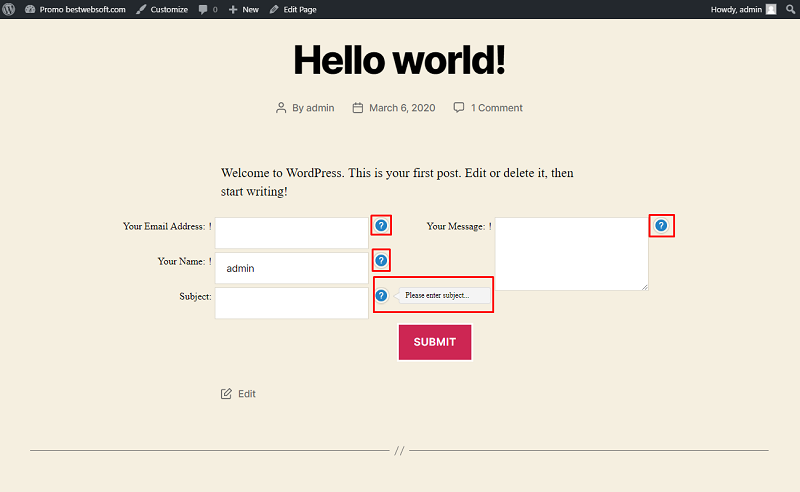
4.9. Add Tooltips
Use the “Add tooltips” to make the explanatory text visible only in case the user clicks hovers a cursor on the “question” icon.

4.9.1. Enable the necessary fields to add tooltips to them.

4.9.2. The tooltips on the contact form will look as follows.
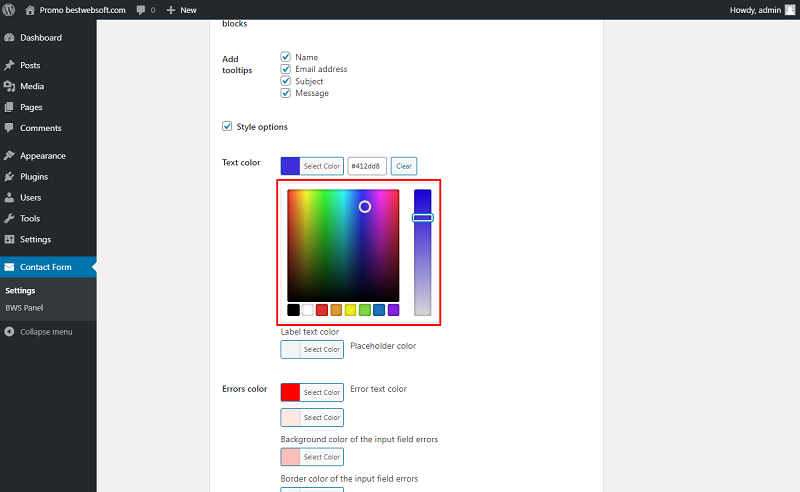
4.10. Style Options
Use the “Style options” section to adjust the color of the entered text, error text, input fields, and submit button. Enable the “Style options” to display the extended style options.

4.10.1. Text Color
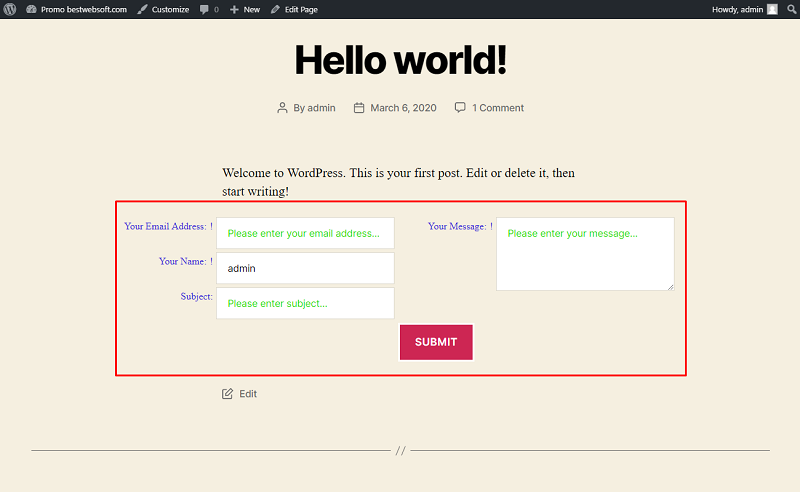
Use the “Text color” option to change the color of the text in the contact form.

4.10.1.1. Choose the “Labels text color” and “Placeholder color” by means of the color picker.
4.10.1.2. The contact form with customized labels and placeholders may look as follows.
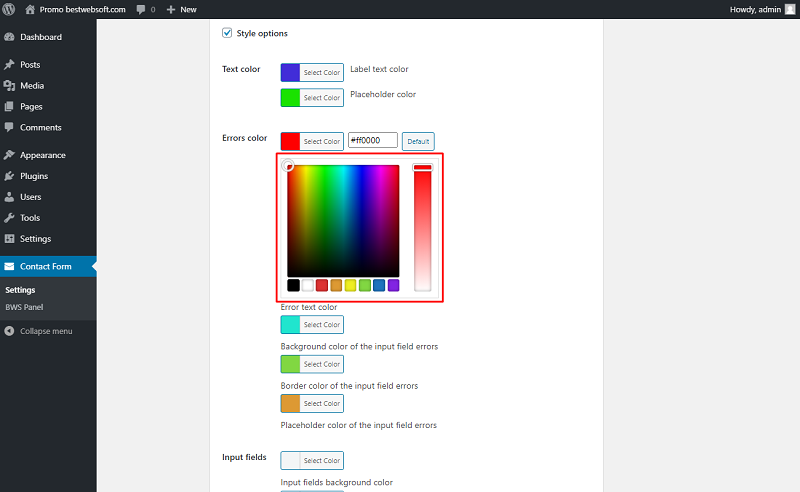
4.10.2. Errors Color
Use the “Errors Color” option to change the color of the errors in the contact form.
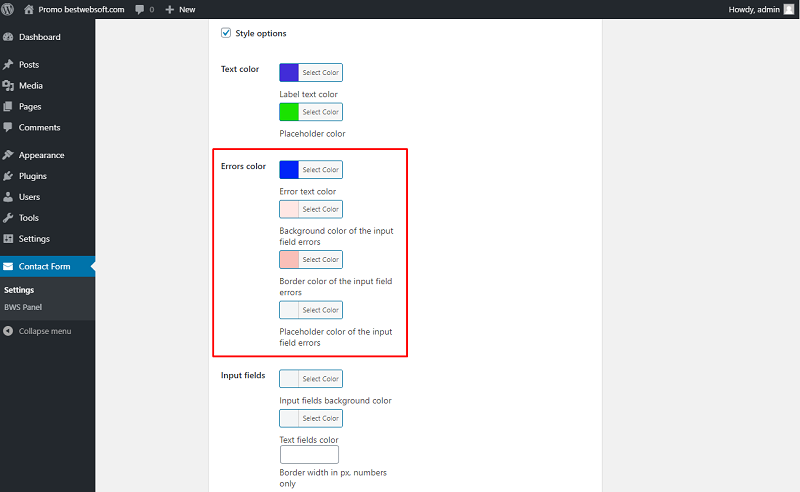
4.10.2.1. Choose the “Error text color”, “Background color of the input field errors”, “Border color of the input field errors” and “Placeholder color of the input field error” by means of the color picker.
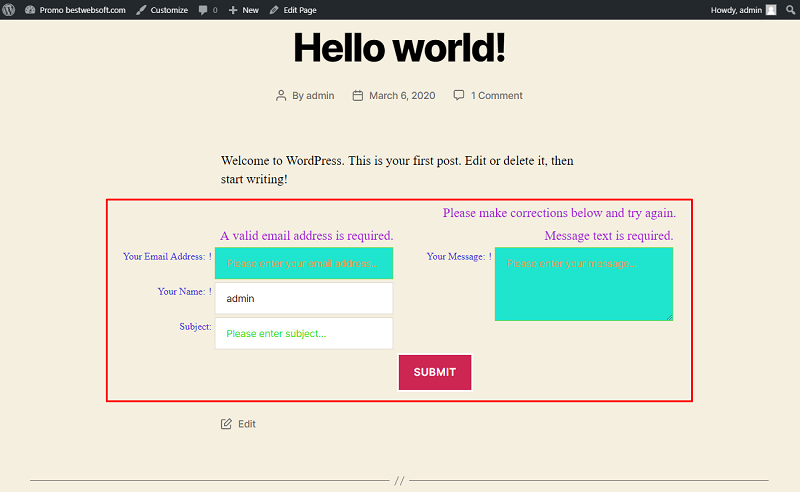
4.10.2.2. The Contact form with customized error colors may look as follows.
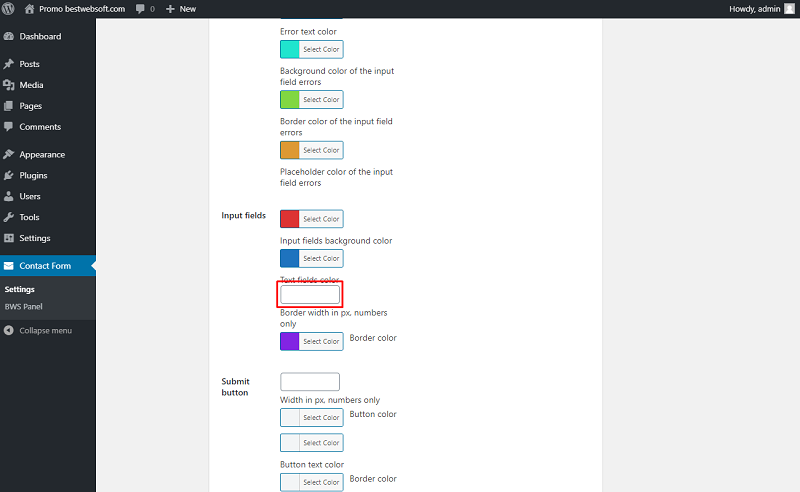
4.10.3. Input Fields
Use the “Input Fields ” option to change the color of the input fields in the contact form and set the border width.

4.10.3.1. Choose the “Input fields background color”, “Text fields color” and “Border color” by means of the color picker.

4.10.3.2. Set the “Border width” in pixels in the appropriate field.
4.10.3.3. The contact form with customized input field colors and custom border width may look as follows.

4.10.4. Submit Button
Use the “Submit Button” option to change the “Button color”, “Border color”, “Button text color” and width of the button.
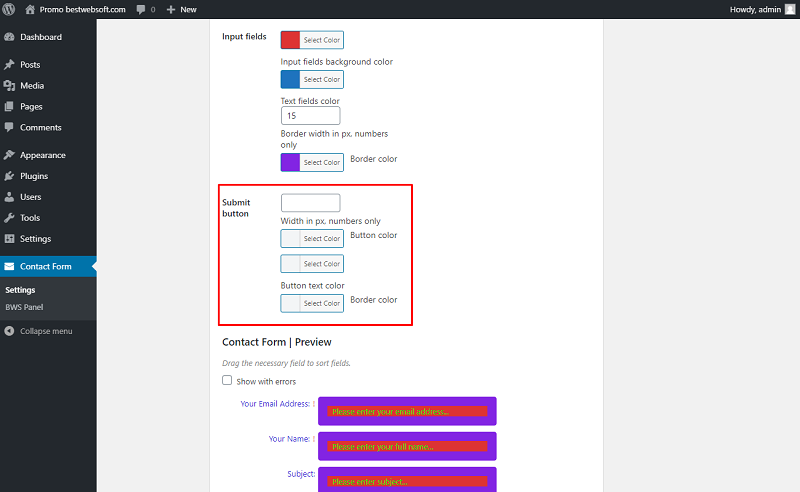
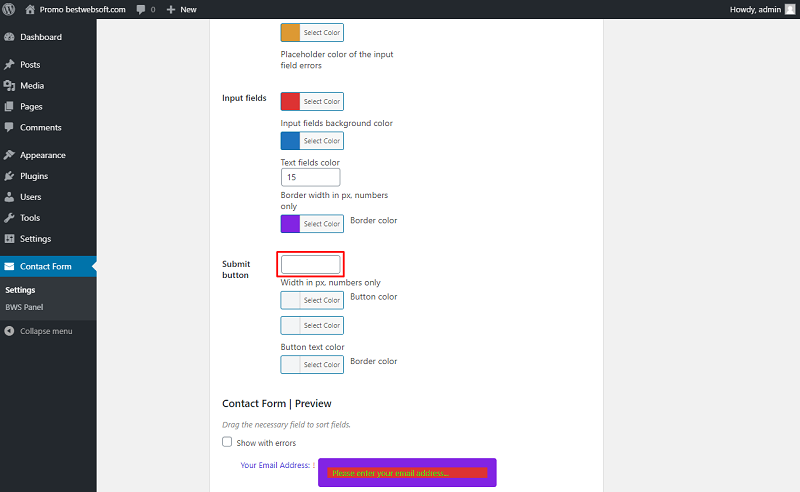
4.10.4.1. Change the width in pixels of the “Submit” button in the appropriate field.
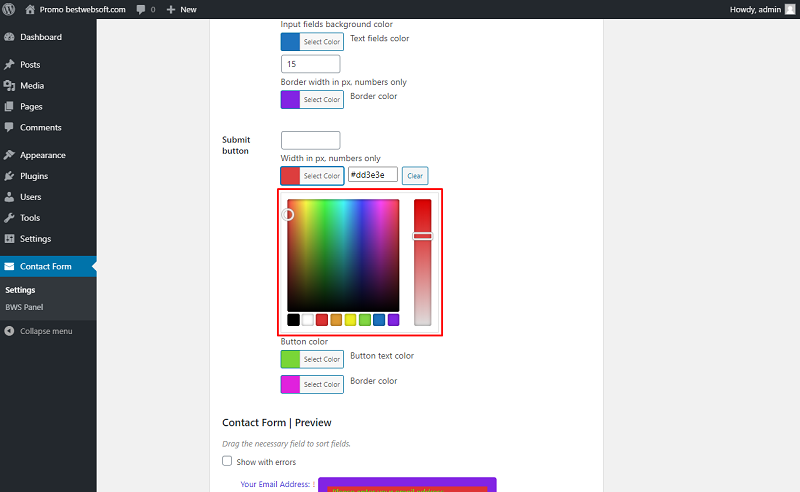
4.10.4.2. Choose the “Button color”, “Button text color” and “Border color” by means of the color picker.
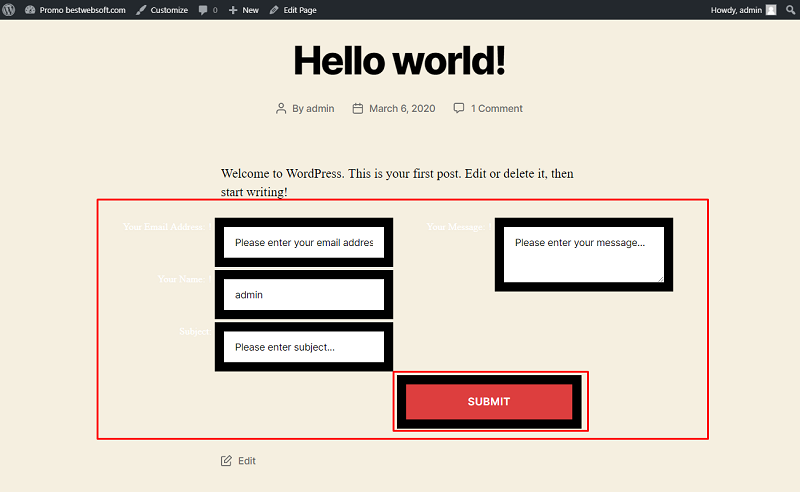
4.10.4.3. The contact form with a customized “Submit” button may look as follows.
4.11. Contact Form Preview
Use the “Contact Form Preview” section to check the result of appearance change without posting a contact form on posts and pages.
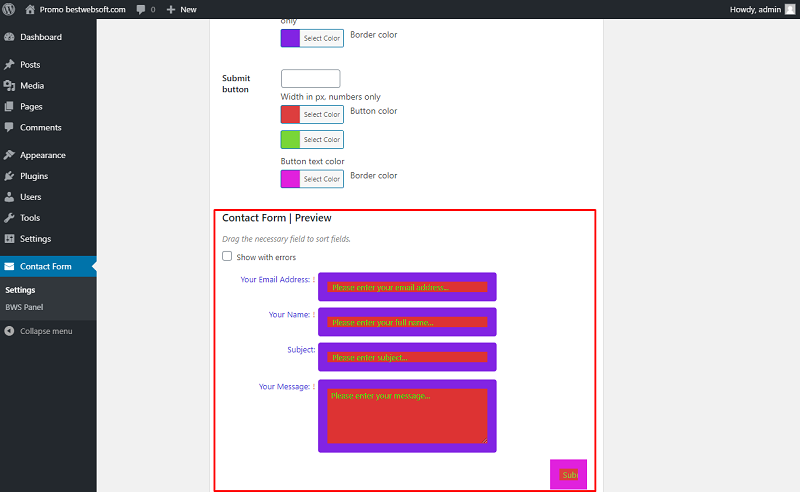
4.11.1. Enable the “Show with errors” to display preview with errors.
5. Miscellaneous Settings
Use the options of the “Miscellaneous Settings” tab to make the settings regarding the track usage and default settings.
5.1. Track Usage
Enable the “Track Usage” option to allow tracking plugin usage anonymously.

5.2. Default Settings
Click the “Restore Settings” button to reset all the settings made previously and revert them to the default ones.

6. Custom Code
Use the “Custom Code” tab to insert a CSS, PHP or JavaScript code. To activate a custom code, enable the “Activate custom … code” option and save changes.

7. License Key
Use the “License Key” tab to activate or check the Pro plugin license.
7.1. Contact Form Pro License
After a successful plugin purchase, you will receive an email notification with a download link and a license key. Activate Pro license by pasting a license key into the “Contact Form Pro License” field and clicking the “Save Changes” button.

7.2. Check License Key
To check the license key, click the “Check license key” button. If the entered key is correct, the notification “The license key is valid. Your license will expire on XXXX-XX-XX” will be displayed in the upper left corner of the page.
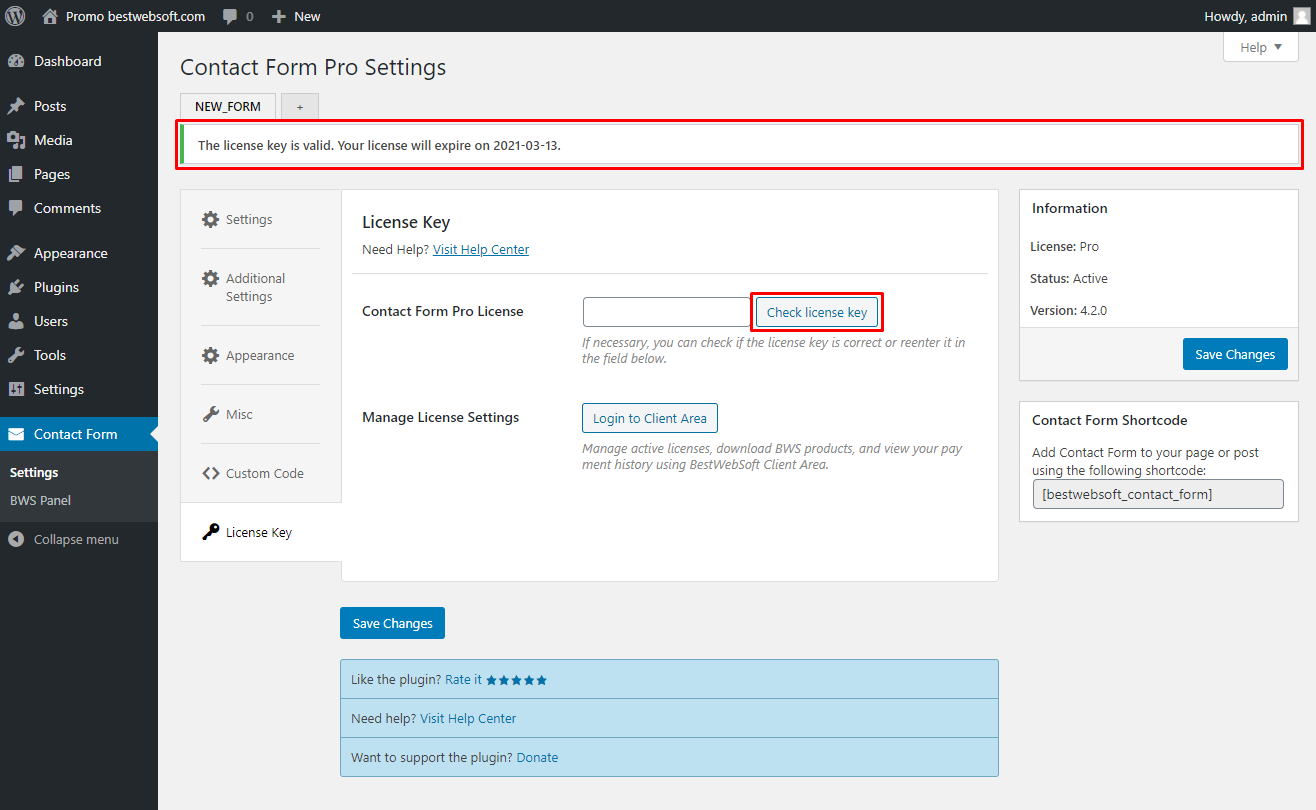
7.3. Manage License Settings
Use the “Manage License Settings” option to change your license settings. Click the “Login to Client Area” button to open your personal Client Area dashboard located on the https://bestwebsoft.com/ website. Browse and download purchased products, change the license domain and copy the license keys.

8. Add the Contact Form on Page or Post.
Add the contact form to your page or post with a shortcode.
8.1. Copy the given shortcode of the “Contact Form Shortcode” section on the right side of the “Settings” page.
8.2. Go to the post or page supposed to contain a Contact Form and open it in the “Edit” mode.

8.3. Paste the copied shortcode in the text editor where you want to have the contact form displayed and click the “Update” button.

Note: In case of any problems with the standard shortcode [bestwebsoft_contact_form], use [bestwebsoft_contact_form lang=en] instead. It works equally. |
8.4. After the update, a post or a page with the contact form may look as follows.

9. Add Multiple Forms
Contact Form by BestWebSoft is compatible with the “Contact Form Multi by BestWebSoft” plugin which allows to create an unlimited number of contact forms with different settings for each form.
You can download the Contact Form Multi by BestWebSoft” plugin here:
https://bestwebsoft.com/products/wordpress/plugins/contact-form-multi/.
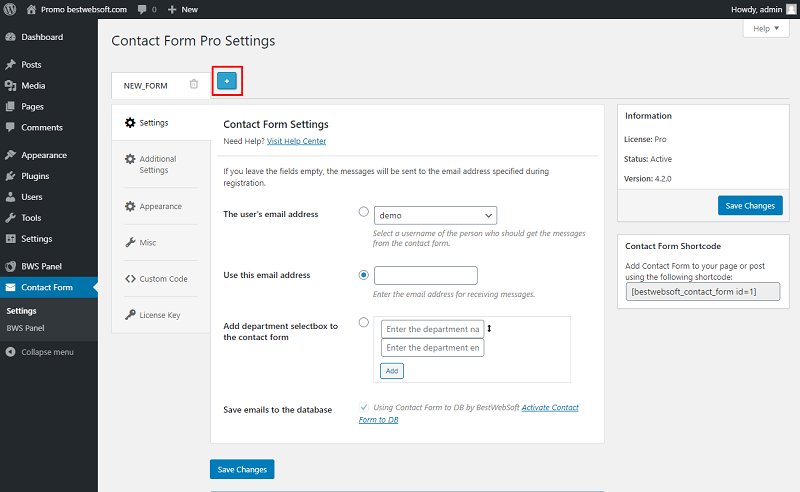
9.1. After the installation and activation of the Contact Form Multi plugin open the Contact Form “Settings” page and click the “Plus” button to create a new contact form with its own settings.
9.2. Configure the added form according to your needs. The configurable settings are identical to the default contact form.

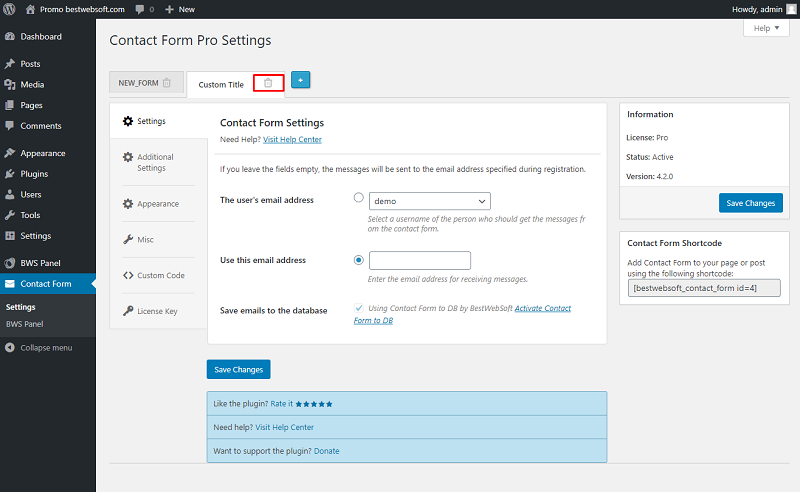
9.3. To change the “Titles” of Contact Form click on the title you need to change and enter the text.

9.4. To delete the added Contact Form click on the “Trash” icon.
9.5. To insert the added contact form to a page or a post select the necessary contact form tab, copy the shortcode from the “Contact Form Shortcode” section and paste it to the necessary place of a post or a page.

9.6. The added contact form may look on a page or post as follows.

Thank you!
Help & Support
Visit our Help Center if you have any questions — https://support.bestwebsoft.com/
Services
We provide additional services such as WordPress themes & plugins development,
graphic design, custom programming.
Contact us now to get a free quote — https://bestwebsoft.com/contacts/